Showing posts with label gradle. Show all posts

Monday, August 28, 2023

Caused by java.io.IOException: CreateProcess error=206, The filename or extension is too long

While working on Java gradle project sometimes we might get the following error in Windows system:

Caused by: java.io.IOException: CreateProcess error=206, The filename or extension is too long

This is due to when classpath for a Gradle JavaExec or Test task is long, Windows command executions give error because of limitation to command line length greater than 32K

With a number of classpath dependencies in a large project, typically JavaExec Gradle task fails with error "The filename or extension is too long" and this would be a stopping error. To solve this issue, we can use the following gradle plugin. Use the plugin inside build.gradle file

apply plugin: "com.virgo47.ClasspathJar"

Or we can use inside build.gradle file under buildscript {} >> dependencies {} section as below:

buildscript {
  repositories {
    maven {
      url "https://plugins.gradle.org/m2/"
    }
  }
  dependencies {
    classpath "gradle.plugin.com.virgo47.gradle:ClasspathJar:1.0.0"
  }
}

For Kotlin project, use it inside build.gradle.kts file as below:

apply(plugin = "com.virgo47.ClasspathJar")

Or we can use it in the build.gradle.kts kotlin file under buildscript {} >> dependencies {}

buildscript {
  repositories {
    maven {
      url = uri("https://plugins.gradle.org/m2/")
    }
  }
  dependencies {
    classpath("gradle.plugin.com.virgo47.gradle:ClasspathJar:1.0.0")
  }
}

ClasspathJar plugin creates a classpath jar for jar files in the classpath and sets the classpath with classpath jar. This includes JavaExec, Test and other similar tasks.

Build the application and run it.

Reference: ClasspathJar

Share:

Tuesday, August 16, 2022

Convert Date to Pretty Time in Grails and Groovy

In this tutorial, we will learn how to convert Java Date to pretty time like moments ago, 1 hour ago, 1 week ago, 1 month ago, 1 year ago, and so on in grails application.

For this, we are using the prettytime plugin in our project.

Load PrettyTime in Grails Gradle project:

Add the following inside dependencies in the build.gradle file.

dependencies {
//other dependencies
 
compile 'org.grails.plugins:grails-pretty-time:4.0.0'
}

PrettyTime format Date:

Now let's create a method that formats the Java Date

import org.ocpsoft.prettytime.PrettyTime
import java.util.Date
public static String formatPrettyTime(Date date) {
        PrettyTime p = new PrettyTime()
        return p.format(date).trim()
    }

This will format the given date to a pretty time like moments ago.

Pretty Time Support Locale:

Prettytime support different language, for this use request to get the current locale and format it.

public static String formatPrettyTime(Date date, request) {
        Locale locale = RequestContextUtils.getLocale(request)
        PrettyTime prettyTime = new PrettyTime(locale)
        return prettyTime.format(date).trim()
    }

Here, we are using the locale from the request which gives the session locale for the current user

Current locale in grails application can also be achieved using LocaleContextHolder

import org.springframework.context.i18n.LocaleContextHolder
Locale locale = LocaleContextHolder.getLocale()

For pretty time supported language please follow prettyTime

Use in Gsp page:

If we are using the GSP pages HTML as server-side rendering, then we can use pretty time in GSP pages as below

<prettytime:display date="${someDate}" />
Share:

Tuesday, July 26, 2022

Setup Http client for API using OkHttp in Java

In this tutorial, we will learn how to use OkHttp for HTTP requests while consuming APIs.

OkHttp is an HTTP client which will do HTTP efficiently by loading faster and saving bandwidth. Using OkHttp is easy. Its request/response API is designed with fluent builders and immutability. It supports both synchronous blocking calls and async calls with callbacks.

Setup the OkHttp dependency:

If we are using the external Jar file, download the jar from okhttp maven.

Follow this tutorial for setting up the Jar file How to add external jar or library on IntelliJ IDEA project

Setup in maven project:

Add in pom.xml

<dependency>
    <groupId>com.squareup.okhttp3</groupId>
    <artifactId>okhttp</artifactId>
    <version>4.10.0</version>
</dependency>

Setup in Gradle project:

Add in build.gradle under "dependencies"

dependencies {
//other dependencies
 
compile("com.squareup.okhttp3:okhttp:4.10.0")
}

Implementation:

Let's create a sample java class HttpClient.java and set up the OkHttp3 client.

import okhttp3.MediaType
import okhttp3.OkHttpClient
import okhttp3.Request
import okhttp3.RequestBody
import okhttp3.Response

class HttpClient {

    public static final MediaType JSON = MediaType.get("application/json; charset=utf-8")


    public static Response doGetRequest(url, String apiKey = '') {
        Request.Builder requestBuilder = new Request.Builder()
                .url(url)
        Request request = setHeadersConfig(requestBuilder, apiKey).build();
        Response response = getClient().newCall(request).execute()
        return response.body().string();
    }

    public static String doPostRequest(String json, String url, String apiKey = '') {
        RequestBody body = RequestBody.create(json, JSON)
        Request.Builder requestBuilder = new Request.Builder()
                .url(url)
                .post(body)
        Request request = setHeadersConfig(requestBuilder, apiKey).build();
        Response response = getClient().newCall(request).execute()
        return response.body().string()
    }

    public static String doDeleteRequest(String json, String url, String apiKey = '') {
        RequestBody body = RequestBody.create(json, JSON)
        Request.Builder requestBuilder = new Request.Builder()
                .url(url)
                .delete(body)
        Request request = setHeadersConfig(requestBuilder, apiKey).build();
        Response response = getClient().newCall(request).execute()
        return response.body().string()
    }

    private static Request.Builder setHeadersConfig(Request.Builder requestBuilder, String apiKey) {
        requestBuilder.header("Content-Type", "application/json")
                .header("X-MBX-APIKEY", apiKey)
        return requestBuilder
    }

    private static OkHttpClient getClient() {
        return new OkHttpClient()
    }
}

This class contains the setup for the post, get and delete request.

Method setHeadersConfig is for setting up the headers we used sample X-MBX-APIKEY header configuration to set the API key. You can use your desired header configuration there.

We can pass the post body by formatting the data in JSON string.

Please don't forget to handle the Exception.

Getting Status Code:

We can get the status code from the Response response object in the above example as below:

 Response response = getClient().newCall(request).execute()
        int statusCode = response.code()

Using it from Java classes:

All the methods are static so we can simply use it from other java classes as below:

HttpClient.doPostRequest(json, url, apiKey)
Share:

Friday, July 1, 2022

How to add external jar or library on IntelliJ IDEA project

In this tutorial, we will learn how to add external jar files to the project and load it using Intellij Idea.

Load Jar for Simple Java Application:

Let's create a directory called libs under the project root directory and add all the external libraries. Now we need to load those Jar files using Intellij Idea.

In Intellij, click on >> File >> Project Structure or hit Ctrl + Alt + Shift + s. This will open the popup window to load library.

Note: Select the New project library as Java in step 2 as shown in the figure.

Then click ok to load the libs folder module and click on Apply and Ok. Now we can access the Jar from our java classes.

Loading Jar/Library from Gradle Project:

Add the following inside dependencies in build.gradle file.

dependencies {
//other dependencies
 
compile fileTree(dir: 'libs', include: '*.jar')
}

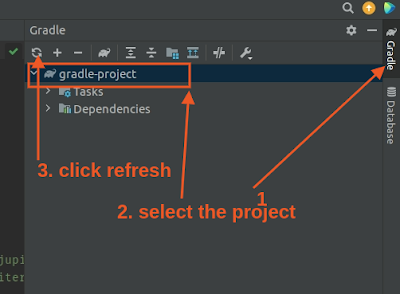
After that in IntelliJ idea you can see the Gradle on the right side, click on it and refresh the Gradle project as below:

Loading Jar/Library from Maven Project:

Add the following system dependency inside pom.xml file.

<dependency>
           <groupId>com.libName</groupId>
           <artifactId>lib-artifact</artifactId>
           <version>20220117</version>
           <scope>system</scope>
           <systemPath>${basedir}/libs/jar_file_name.jar</systemPath>
       </dependency>

Make sure to change the group id, artifact id, and system path.

After that from the IntelliJ idea on the right side, you can see the Maven click on it and refresh the project by clicking the project name as below.

Share: