Showing posts with label pwa. Show all posts

Friday, January 1, 2021

Adding PWA support in existing VueJs application

In this tutorial, we are going to add the PWA support in the existing VueJs application.

1. Install Vue CLI

npm install -g @vue/cli
# OR
yarn global add @vue/cli

2. Add PWA in our application

Let's open the terminal or command prompt and go to the project directory and add PWA  to the project.
vue add pwa
This will add a couple of files and settings for PWA in our existing application.

1. registerServiceWorker.js under ./src directory.


/* eslint-disable no-console */

import { register } from 'register-service-worker'

if (process.env.NODE_ENV === 'production') {
  register(`${process.env.BASE_URL}service-worker.js`, {
    ready () {
      console.log(
        'App is being served from cache by a service worker.\n' +
        'For more details, visit https://goo.gl/AFskqB'
      )
    },
    registered () {
      console.log('Service worker has been registered.')
    },
    cached () {
      console.log('Content has been cached for offline use.')
    },
    updatefound () {
      console.log('New content is downloading.')
    },
    updated () {
      console.log('New content is available; please refresh.')
    },
    offline () {
      console.log('No internet connection found. App is running in offline mode.')
    },
    error (error) {
      console.error('Error during service worker registration:', error)
    }
  })
}
Inside this file, the service worker is registered, and also, we can see the different hooks implemented which we can use in different cases like when the update is found in the app when the user is offline etc.

2. Dependencies added

Under package.json you can see the register-service-worker and PWA plugin is added.


3. Added some icons

Under public/img/icons/ folder some icons are added for mobile, desktop display. Make sure to change your icons for different devices. For more detail on changing this follow the following article.


If you want to configure via config file follow this guide.

Besides this, registerServiceWorker is imported inside main.js file.

3. Build and Deploy the application.

Build and deploy the application, you can see the service worker is activated and running.


You can see the cached file inside cache storage.

By default, it uses default mode which means a service worker is generated for us. If you want to customize it follow the following articles.


To notify the users about the app update follow the following post.


Share:

Sunday, December 20, 2020

VueJs PWA: Notify User about the App Update | skipWaiting

Once the application is updated and deployed then, the new version of the application will be available. But how we can notify the user that a newer version is available while they are interacting with the application. How to give the user control over app updates.

Please check out my previous articles on PWA:


1. Understanding how the UI get an update when new content is available:

When you change the app content and deploy it then, you can see in the browser what the service worker is trying to do.


Here, you can see, as soon as the new content is available new service worker trying to install it and is in waiting state.

Although, the old service worker is registered and serving with the old content. The new service worker will be still in a skip waiting state i.e waiting.

Here, once we notify the user about the new update and if they allow us to update the app we can simply do skip waiting and reload the page for new content. After that, a new service worker will be activated and will serve with a new update available.

2. Register the custom event to notify the user about the app update:

We know that service worker can't access the web DOM element directly. As they will run in the background in a separate thread. So we have to notify users from our application. In order to do so, we need to register the custom event which can be listened to in the application.

You can see the file registerServiceWorker.js which is generated by Vue CLI.

/* eslint-disable no-console */

import { register } from 'register-service-worker'

if (process.env.NODE_ENV === 'production') {
  register(`${process.env.BASE_URL}service-worker.js`, {
    ready () {
      console.log(
        'App is being served from cache by a service worker.\n' +
        'For more details, visit https://goo.gl/AFskqB'
      )
    },
    registered () {
      console.log('Service worker has been registered.')
    },
    cached () {
      console.log('Content has been cached for offline use.')
    },
    updatefound () {
      console.log('New content is downloading.')
    },
    updated () {
      console.log('New content is available; please refresh.')
    },
    offline () {
      console.log('No internet connection found. App is running in offline mode.')
    },
    error (error) {
      console.error('Error during service worker registration:', error)
    }
  })
}

There are multiple events that will be triggered. Here, we need to use the updated hook to notify the user. Let's register for the custom event.
updated (registration) {
      console.log('New content is available; please refresh.')
      document.dispatchEvent(
          new CustomEvent('serviceWorkerUpdateEvent', { detail: registration })
      );
    },
Now let's add this event listener serviceWorkerUpdateEvent in our application. Inside App.vue
created() {
    document.addEventListener(
        'serviceWorkerUpdateEvent', this.appUpdateUI, { once: true }
    );
  },


Let's add some data used and appUpdateUI function.
data: () => ({
    registration:null,
    isRefresh: false,
    refreshing: false,
  }),
  methods:{
    appUpdateUI:function (e){
      this.registration = e.detail;
      this.isRefresh = true;
    }
  }

When the updated event inside registerServiceWorker.js triggered then serviceWorkerUpdateEvent will be triggered which calls the appUpdateUI to show the button to update. Let's add a simple button inside the template as a user interface to update the app. You can use a nicer snack bar instead.
<button v-if="isRefresh" @click="update">Update</button>
Let's add update() inside methods.
update(){
     this.isRefresh = false;
     if (this.registration || this.registration.waiting) {
       this.registration.waiting.postMessage({type:'SKIP_WAITING'});
     }
   },
Now when the user clicks the update button then it will send the post message of type 'SKIP_WAITING' to communicate with the service worker.

If you are using GenerateSW mode then make sure this post message matches the message listener inside the service worker. You can verify it by building your app. Once the app is built then under dist/ folder you can find the service-worker.js to verify.

If you are using injectManifest mode then, use the message listener as below inside service-worker.js:
self.addEventListener('message', (event) => {
  if (event.data && event.data.type === 'SKIP_WAITING') {
    self.skipWaiting();
  }
});
Now, this listener will be triggered and it will do skip waiting. The last thing is we need to reload the application to reflect the content change.


For this, we can use 'controllerchange' listener in our application. Under App.vue inside created use the following listener.
created() {
    navigator.serviceWorker.addEventListener(
        'controllerchange', () => {
          if (this.refreshing) return;
          this.refreshing = true;
          window.location.reload();
        }
    );
  },
This is the idea to notify the user of the App update.
Share:

How to Use and Customize Service Worker in VueJs Progressive Web Apps(PWA)

 1. Introduction:

What exactly a service worker? What is the need of service worker in our web application?

The service worker is the script that runs in the browser in the background. This means the service worker will run in a separate thread and is independent of our web pages. Service worker can't access the DOM directly.

The service worker is very handy for the caching strategy, push notification, background sync. This means we can manage which files need to be cache and which are not.

Also particularly for mobile app, when it is not opened and needs to send the push notification As well as if the app is not opened and needs to send the request to the server.

Please visit our previous articles on PWA:


2. Default Implementation of Service Worker in VueJs PWA:

VueJs application with Vue CLI uses the default configuration to set up and use the service worker.


If you build your application then, you can see the service worker file generated.
yarn build
 

There are two webpack plugin mode, one is GenerateSW mode which will generate the complete service worker. Vue CLI uses this as a default mode.

Another is InjectManifest mode, which allows us to customize and organize as our requirement and we do have full control over service worker.

If you want to know when to use and when not to use these modes please visit Workbox webpack Plugins

You can see the default service worker generated after building the application as shown in the figure above.

We are going to use the InjectManifest mode so that we can have control over the service worker.

3. Register the Service Worker:

The service worker registration is done by Vue CLI by default. You can see the registerServiceWorker.js under /src folder, the file looks as below:
/* eslint-disable no-console */

import { register } from 'register-service-worker'

if (process.env.NODE_ENV === 'production') {
  register(`${process.env.BASE_URL}service-worker.js`, {
    ready () {
      console.log(
        'App is being served from cache by a service worker.\n' +
        'For more details, visit https://goo.gl/AFskqB'
      )
    },
    registered () {
      console.log('Service worker has been registered.')
    },
    cached () {
      console.log('Content has been cached for offline use.')
    },
    updatefound () {
      console.log('New content is downloading.')
    },
    updated () {
      console.log('New content is available; please refresh.')
    },
    offline () {
      console.log('No internet connection found. App is running in offline mode.')
    },
    error (error) {
      console.error('Error during service worker registration:', error)
    }
  })
}
Note: make sure to change the service worker name if you use a different name for it.


Here, the service worker is enabled only for production, enabling service worker in development mode is not encouraged, as it will not reflect the current changes in development, instead it will use cached resources. All the events will be triggered in different cases. 

4. Customize Service Worker with InjectManifest Mode:


Let's copy the service worker service-worker.js file from the dist/ folder or create a new  service-worker.js file under the src/ directory.


Now, let's configure the config to notice that we are using the InjectManifiest mode and provide the newly created service worker path to use that service worker.

For this, create a vue.config.js file under the app root directory. Make sure to have the same name mentioned so this config file will be used by Vue CLI. The file looks as below.


Now, lets set up the config:
 pwa:{
        workboxPluginMode: "InjectManifest",
        workboxOptions:{
            swSrc:"./src/service-worker.js",
        }
    }


Add the above PWA configuration inside the vue.config.js file. Here, we are using plugin mode as InjectManifest and give the path of the newly created service-worker.js file.

The custom service worker file needs to be as shown below:

workbox.core.setCacheNameDetails({prefix: "vue-pwa"});

self.__precacheManifest = [].concat(self.__precacheManifest || []);
workbox.precaching.precacheAndRoute(self.__precacheManifest, {});

self.addEventListener('message', (event) => {
    if (event.data && event.data.type === 'SKIP_WAITING') {
        self.skipWaiting();
    }
});

Let's change the cache name from "vue-pwa" to "vue-pwa-test" and build the application. If you look into the service-worker.js under the dist/ folder and if you see the changes there, you are good to go.

Also, you can see some import scripts added at the beginning of the file by Vue CLI which looks something like below.
importScripts("/precache-manifest.7b241a43a2278739512d45eb32884cc1.js", "https://storage.googleapis.com/workbox-cdn/releases/4.3.1/workbox-sw.js");
The precache-manifest has a different json config for different files to cache. Note, the file name to be cache will be different in each build. Now, build and deploy the application.

Note: each change in the application will be reflected in the browser after new content is updated and the app is reloaded or refreshed.


Now, click on "skipWaiting" and reload the page which will reload our application with new changes. We will do this skipWaiting from the application in the next tutorial by giving the user control of the app update. Or if you do it right away especially for testing you can add the following inside service-worker.js.
workbox.core.skipWaiting();

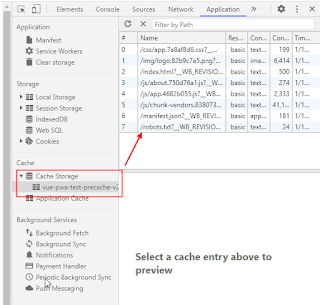
You can see the caching files under the cache storage tab.


The life cycle of the service worker is implemented by default. You can handle each event/hooks inside registerServiceWorker.js file as mentioned in step 3.

Now, you can especially handle different push notifications, background sync, using indexdb inside this custom service worker created.

5. Service Worker Life Cycle Event:

If you want to implement the lifecycle event on your own you can use them inside the service-worker.js file itself. Make sure to unregister the service worker from the registerServiceWorker.js file and register your service worker. It can be done in the main.js file.  Some of the life cycle events are below: 
self.addEventListener('install', (event) => {
  console.log("Installing ....................");
});
self.addEventListener('activate', (event) => {
  console.log("activateing ....................");
});
self.addEventListener('fetch', (event) => {
  console.log("fetching ....................");
});
self.addEventListener('message', (event) => {
  if (event.data && event.data.type === 'SKIP_WAITING') {
    self.skipWaiting();
  }
});
If you want to know more about these events please look Service Workers: an Introduction.

Share:

Wednesday, December 16, 2020

VueJs Progressive Web Apps(PWA): How to Change the App Name, Icon, Color, Display for Mobile Devices.

In this tutorial, I will show you how to create and change the Manifest file. The manifest file will allow the way of displaying our application, especially on mobile devices i.e showing app name, app icon for different size mobile screen, the color of the app, etc.

Please visit our previous articles on PWA:

Create a Simple VueJs Progressive Web Apps (PWA) and Deploy to Firebase


Create a Manifest file.

The default manifest file will be created when you build your application with Vue CLI. Let's build our application.

yarn build
Now you can see the manifest.json file under the dist/ folder. This is the file that we are going to modified according to our requirements.


To change this file first copy the file inside the public/ folder. On each build, all the files under the public folder will be copied to the dist/ folder so we have our changes in production.


 The manifest.json file looks like below:
{
  "name": "vue-pwa",
  "short_name": "vue-pwa",
  "theme_color": "#4DBA87",
  "icons": [
    {
      "src": "./img/icons/android-chrome-192x192.png",
      "sizes": "192x192",
      "type": "image/png"
    },
    {
      "src": "./img/icons/android-chrome-512x512.png",
      "sizes": "512x512",
      "type": "image/png"
    },
    {
      "src": "./img/icons/android-chrome-maskable-192x192.png",
      "sizes": "192x192",
      "type": "image/png",
      "purpose": "maskable"
    },
    {
      "src": "./img/icons/android-chrome-maskable-512x512.png",
      "sizes": "512x512",
      "type": "image/png",
      "purpose": "maskable"
    }
  ],
  "start_url": ".",
  "display": "standalone",
  "background_color": "#000000"
}

We will discuss each property used here. If you have difficulties generating this file make sure to create one with this structure.

If you deploy with this default configuration and open it into your mobile then you can see the below display.

Note: we are using the default vue CLI application for testing.


name :

This will be the name displayed on the screen(splash screen) before the application load the CSS. Please change the name you want for your application. When you click the icon then you will see this name and icon as a first screen.

short_name:

This is similar to the name property but displayed under the launcher icon as shown above.

theme_color:

The default theme color of the application.

icons:

Different icons used for different screen mobile devices. For e.g the different launcher icon size for the different screen for the android device looks as below:


Make sure to put different size image icon for your app under public/img/icons folders or if you want to use in a different folder inside public/ then use the same path on manifest.json file.

By providing different size icons, the icon will be used according to the different screen size devices.

start_url:

This will be the URL for the entry point when you add the app to the home screen.

display:

"that determines the developers’ preferred display mode for the website. The display mode changes how much of browser UI is shown to the user and can range from the browser (when the full browser window is shown) to fullscreen (when the app is full-screened)."

background_color:

This defines the background color of the splash screen before the application CSS is loaded. When you click the app on your device, initially it will load the background color with icons before the app is loaded.

For other properties and more descriptions please visit Web App Manifest. 

Finally, make changes to the properties under manifest.json and build the application and deploy. You can see the desired changes in your mobile devices.


Share:

Monday, December 14, 2020

How to Test Our VueJs Progressive Web Apps(PWA) Locally over HTTPs.

In this tutorial, I will show you how we can test our PWA application locally. The PWA needs an HTTPS connection to work properly. So, it's better to test the application over HTTPs locally.

Make sure you have a sample running PWA locally. I am using vuejs sample PWA application for testing purposes.

1. Build our application:


yarn build
This will create the dist folder which is deployment-ready.


2. Install an http-server package:

First, install http-server package globally, which helps to run the dist folder. For this, open a terminal or command prompt to run the following command.

For npm package manager:
npm install http-server -g

For yarn package manager:
yarn global add http-server

Make sure to refresh your terminal or command prompt after installing the package.

Now, run the application using this package.
http-server dist/
Where dist/ is the folder created while building the application. This will run the application. If you open the application, you will see that our application is not working properly as no service worker is registered.


3. Install and setup Ngrok to run the application.

Here, we are using the third-party service called Ngrok which is free for testing.

What it will do is it will simply tunnel our local server with a specific port over HTTPS which is what we want to test locally. 

Download it from Ngrok download.

Go to the downloaded folder and extract it. You can see the executable binary file. In order to run the file please follow as below.

For Windows:

Simply double click that .exe file. Which will open in the command prompt.

Now, you are ready to tunnel your local server. Use the following command to tunnel your server.
ngrok.exe http 8080
Make sure your application is running in port 8080 otherwise, use your own port instead.


You can see similar to the above. Now you can open the HTTPS tunneled URL.

If you are getting an Invalid Host header issue then you can simply run the below command instead which resolves the issue.
ngrok.exe http 8080 -host-header="localhost:8080"
For Linux: Go to the extracted Ngrok file directory and use the following command.
./ngrok http 8080


If you get the issue with an Invalid Host header then use the following command instead:
./ngrok http 8080 -host-header="localhost:8080"
Once, you open the URL, you can see the service worker for PWA will be working as below.


Share:

Saturday, December 12, 2020

Create a Simple VueJs Progressive Web Apps (PWA) and Deploy to Firebase

In this tutorial, we are going to create a simple VueJs PWA application and also show you how to deploy it to firebase. As we know that PWA is being more famous these days due to its very fast performance and can be used for different platforms with a single code base as well as the offline functionality and caching support.

1. Install Vue CLI

If you haven't installed the Vue CLI, open the command prompt or terminal and run the following command to install it globally. 

- For npm package manager:

npm install -g @vue/cli
- For yarn package manager:

yarn global add @vue/cli


2. create a VueJs PWA project:

vue create vue-pwa
Now, select the manual option

Select Progressive Web App (PWA) Support option from the list. As you need to go to that option using the down arrow on the keyboard and hit the spacebar to select that option. Also select the other option if you are going to use them like Router, Vuex, etc.


Now, go to the project directory and run the application.
cd vue-pwa
yarn serve
Vue CLI created a sample demo application for us so, we are using the same for this tutorial. If you look into the Application tab by doing the inspect element of the above running project, there you can see the Service Workers. The main heart of the PWA is this service worker. As if we run the PWA application locally the service worker will not work, as it required an HTTPS secure connection.


The service worker is the script that will run in the background separately from the application which helps to install, activate, caching of our application. There are more thing about service worker, will discuss in the future article.

So how we can test the PWA application. As we can use some third-party services as well as we can simply deploy to firebase.

3. How to test our PWA application locally:

- Build the application in production mode:

yarn build
This will create the deployment-ready dist folder.

First, run this locally using http-server package. In order to do the show first install it globally.
npm install http-server -g
Now, run the dist folder:
http-server dist/
Which will run the application. Now what we need to do is tunnel our local server with HTTPS. Please follow this Tunnel local server to the public internet with HTTPS using Ngrok. This will tunnel our local server over HTTPS. Now open the tunneled URL. You can see the service worker as follows.


Also, you can see the + icon to install your PWA app in the browser.


If you run the same tunneled URL on the mobile then you will get the following screen to install your PWA application.

Add vue-pwa to Home screen if you click this, it will add the application to the home screen so that you can later open it by simply clicking it.

4. Deploy to firebase.

Now, let's deploy the build dist folder in the firebase server.

- Go to the firebase console "https://console.firebase.google.com/"

- Create a project by giving the project name.

- Installing firebase in our system.

 Open the command prompt or terminal and install firebase globally.
npm install -g firebase-tools
Initialize the project: Make sure to go to the project directory.
firebase login
This will ask for a google login. You can authenticate the google account where your firebase console project is created. If you want to logout use the following command.
firebase logout
Now, initialize the project:
firebase init
This will ask a couple of question make sure you insert the right as below:
We are simply using it for hosting our application so chose the same option.


Make sure the above setting. The public directory will be dist in our case, as we are deploying the dist folder.

This will create two files in our project:

- .firebaserc

where you can find the project's configuration. Make sure you have the same project name in the "default" section to that create on the firebase console. While deploying it, will use the same firebase console project created. In my case, it is "vue-pwa-7ed80". The config file looks like below.

{
  "projects": {
    "default": "vue-pwa-7ed80"
  }
}

- firebase.json

where all the hosting configuration is done. The config file looks like below.

{
  "hosting": {
    "public": "dist",
    "ignore": [
      "firebase.json",
      "**/.*",
      "**/node_modules/**"
    ],
    "rewrites": [
      {
        "source": "**",
        "destination": "/index.html"
      }
    ]
  }
}

Deploy our application.

First, build the application:
yarn build

Now, deploy the build dist folder

 
firebase deploy

This will deploy our application to the firebase server. You can see the deployment history and track from the console under the Hosting section inside the firebase console.

Firebase gives the live HTTPS URL which you can see in the firebase console. If you run that URL you will see the service worker will register and can be run the application as a PWA application.

Finally, we created a simple VueJs application with PWA support and successfully deployed it to the firebase.


Share: