Showing posts with label Let's Encrypt. Show all posts

Tuesday, August 23, 2022

How to setup auto renewable free SSL certificate using Lets Encrypt and Nginx on Ubuntu machine

In this tutorial, we are going to set up free SSL auto-renewable Let's Encrypt along with Nginx.

Prerequisites:

Before we start setup, first make sure your domain e.g example.com is pointed to the server's public IP address. You can set up and point this configuration from the dashboard of your domain service provider.

Connect to the remote server:

First SSH into the remote server where we want to set up the SSL.

If you are using a server password to connect, use the following command

sudo ssh server_username@ip_address

Here use your server username and server IP address to connect. For example ubuntu@34.344.56

If you are using a .pem file or other private keys to connect to a server then use the following command

sudo ssh -i path_to_pem_file server_username@ip_address

Install Nginx:

First, let's install Nginx on the server using the following commands.

sudo apt-get update
sudo apt-get install nginx

If nginx got successfully installed, then use the following command to verify.

nginx -v
nginx version: nginx/1.18.0 (Ubuntu)

Or we can verify by checking the status

sudo systemctl status nginx

Setup Nginx Configuration:

Now let's configure the Nginx for our domain. For this navigate to the Nginx directory

cd /etc/nginx/sites-available

Here, if we use the ls command we can see the default file for configuration. We will create a new file for our domain to configure for e.g 360learntocode.com, you can create using your domain name.

sudo vim 360learntocode.com

Now the new empty file is open lets edit and inserts the configuration by entering Shift + i

server {
      server_name 360learntocode.com;

      location / {
        proxy_set_header   X-Forwarded-For $remote_addr;
        proxy_set_header   Host $http_host;
        proxy_pass              http://568.19.34.63:8080;
      }
}

Make sure to replace 360learntocode.com with your domain name and http://568.19.34.63:8080 with your IP address and the port in which your application is running.

Now save the configuration. Enter Esc and type :wq and hit Enter.

Now, symlink this file with the directory “sites-available” in our Nginx for this navigate to sites-available

cd /etc/nginx/sites-enabled/
sudo ln -s /etc/nginx/sites-available/360learntocode.com /etc/nginx/sites-enabled/

To check the Nginx configuration use the following command

sudo nginx -t

We are supposed to see the output as below

nginx: the configuration file /etc/nginx/nginx.conf syntax is ok
nginx: configuration file /etc/nginx/nginx.conf test is successful

Reload the Nginx to reflect the changes:

sudo systemctl reload nginx

If we try to open our domain, we can see the Nginx 502 Bad Gateway if our application is not running otherwise we will see the running application.

Setup SSL Certificate:

For the SSL certificate, we are using the let's encrypt and certbot client. For more detail check let's Encrypt and Certbot

- Install Certbot client

Use the following commands to install certbot client

sudo apt-get update
 sudo apt-get install python3-certbot-nginx

Now, the certbot is successfully installed on our server. Let's create an SSL certificate for our domain

sudo certbot --nginx -d 360learntocode.com

Note: use your own domain name. Follow the steps asked afterward.

Here are some sample examples screens.

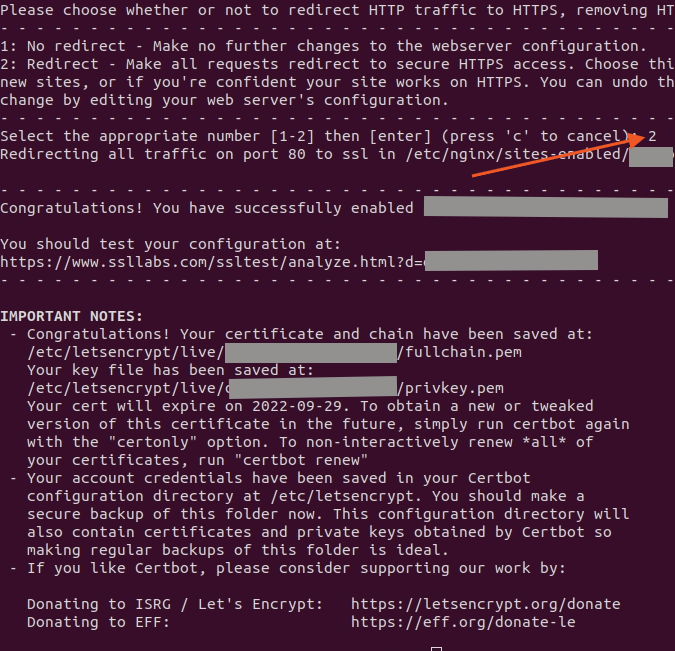
Now, let's reload the Nginx so that our configuration changes will reflect.

sudo systemctl reload nginx

If we load our domain URL then it will open over HTTPS.

If you want to see the overall configuration setup, please open the file that we created previously i.e 360learntocode.com inside /etc/nginx/sites-available/, there we can see all the setup done. The sample file looks like as below.

server {
      server_name 360learntocode.com;

      location / {
        proxy_set_header   X-Forwarded-For $remote_addr;
        proxy_set_header   Host $http_host;
        proxy_pass              http://568.19.34.63:8080;
      }


    listen 443 ssl; # managed by Certbot
    ssl_certificate /etc/letsencrypt/live/360learntocode.com/fullchain.pem; # managed by Certbot
    ssl_certificate_key /etc/letsencrypt/live/360learntocode.com/privkey.pem; # managed by Certbot
    include /etc/letsencrypt/options-ssl-nginx.conf; # managed by Certbot
    ssl_dhparam /etc/letsencrypt/ssl-dhparams.pem; # managed by Certbot

}
server {
    if ($host = 360learntocode.com) {
        return 301 https://$host$request_uri;
    } # managed by Certbot


      server_name 360learntocode.com;
    listen 80;
    return 404; # managed by Certbot


}

Here, the auto-renew script is managed by certbot client so we don't have to worry about the SSL expiration. To verify the auto-renew scripts navigate to the script file.

cd /etc/cron.d/
sudo vi certbot

In the certbot file, we can see the auto-renew script as below added by cerbot client

0 */12 * * * root test -x /usr/bin/certbot -a \! -d /run/systemd/system && perl -e 'sleep int(rand(43200))' && certbot -q renew

Thanks for following the tutorial, Happy coding !!

Share:

Tuesday, January 25, 2022

How to Install and configure free SSL/TLS certificate for Tomcat using Let's Encrypt on Ubuntu.

How to set up a free SSL certificate for tomcat using let's encrypt on ubuntu.

1. Introduction:


Here, we are going to set up a free SSL certificate provided by a non-profit authority called Let's Encrypt. This is trusted and used by many to secure their website. The certificate is valid for only 90 days and can renew during that time. You can find out more about Let's Encrypt here

2. Prerequisites:

  • Running ubuntu server
  • Running tomcat server
  • Domain name pointed to the server Ip address

3. Install certbort and create an SSL certificate:
SSH into the server where you want to create a certificate. In order to create an SSL certificate, we need to install certbot for this, go and select the appropriate ubuntu server version from here. As we are using ubuntu 18.04 LTS.


which will give the following command to install certbot.

Add Certbot PPA
 
 sudo apt-get update
sudo apt-get install software-properties-common
sudo add-apt-repository universe
sudo add-apt-repository ppa:certbot/certbot
sudo apt-get update
Install Certbot
sudo apt-get install certbot
If you have already running service which uses port 80, stop it first otherwise you will get Address BindException.

To obtain an SSL certificate for your domain using a built-in "standalone" webserver type the following command:
sudo certbot certonly --standalone -d example.com
Here, replace the domain name you want to secure instead of example.com 

which will create a different certificate file to the directory:   /etc/letsencrypt/live/example.com/

Now, logged in as root user and go to that directory
sudo -i
cd /etc/letsencrypt/live/example.com/

Next step is to convert those certificate PEM file to password-based PFX format so that we can use in tomcat configuration. We can do this by using OpenSSL command as below.
openssl pkcs12 -export -out bundle.pfx -inkey privkey.pem -in cert.pem -certfile chain.pem -password pass:password
Replace the password with your desired one. It will create a password-protected file bundle.pfx under the same directory "/etc/letsencrypt/live/example.com/" which we need to use in tomcat configuration.


4. Tomcat configuration for HTTPs:

Go to your tomcat directory, and backup the server.xml file; as we are going to change the file. It's always a good approach to backup the config file before changing it.
cp conf/server.xml conf/server-copy.xml
 
Edit the server.xml file.
sudo vi conf/server.xml  // no need to type sudo if you are logged in as root user
  
You can see the following xml tag(for tomcat 8), we are going to change this: 


Replace the above tag such that the config look like as below: 


Here, we are changing port 8443 to 443, keystoreType as "PKCS12", keystoreFile as the path of the pfx file created previously and keystorePass as your password that we used while creating PFX file. 

Change the port 8080 to 80: 

Under server.xml you can find the following tag.


change the above xml tag as below:  


Here, we are changing the port from 8080 to 80 and 8443 to 443. By doing so, if your domain running with port 8080 i.e example.com:8080, now it will open with port 80 i.e example.com. If you type your domain in the browser then you can run it with both HTTP and https i.e http://example.com and https://example.com.

Save the server.xml file by clicking "Esc" key and type ":wq!" and hit Enter. 

As we want to always redirect our domain to https. To do so, open the web.xml file under conf/web.xml.
sudo vi conf/web.xml
  
And add the below code at the end of file before the end of "/web-app" xml tag.
<security-constraint>
  <web-resource-collection>
  <web-resource-name>Entire Application</web-resource-name>
   <url-pattern>/*</url-pattern>
 </web-resource-collection>
  <!--auth-constraint goes here if you requre authentication-->
 <user-data-constraint>
 <transport-guarantee>CONFIDENTIAL</transport-guarantee>
 </user-data-constraint>
 </security-constraint>

Which will always redirect to HTTPs.

 
5. Renew certificate:

The certificate is valid for only 90 days so we need to renew before expiry. For this, stop tomcat and type the following command:
sudo certbot renew
 
sudo -i
cd /etc/letsencrypt/live/example.com/
openssl pkcs12 -export -out bundle.pfx -inkey privkey.pem -in cert.pem -certfile chain.pem -password pass:password
 
Don't forget to use your existing password. And restart the tomcat server.

Share:

Sunday, June 7, 2020

Create a Self-Signed free SSL certificate for Tomcat on CentOS Linux using Let's Encrypt.

How to Install and configure a free SSL/TLS certificate for Tomcat using Let's Encrypt on Centos Linux.


In this tutorial, we are going to create and set up a free SSL/TLS certificate on the Linux CentOS server. We are using Let's Encrypt for this which provides the free SSL and is valid for 90 days. You can renew it during that time duration. We will show how to renew it too. You can find about Let's Encrypt from here.

This service is used by many people to secure their website worldwide so, it's totally trust-worthy and supported if you can't afford from other paid service provider.


2. prerequisites:

We consider you already have the following setup.

  1. Running CentOS server
  2. Running tomcat server
  3. Domain pointed to the server Ip address


3. Install Certbort and create an SSL certificate:

First, SSH into to the running CentOS server where you want to create your SSL certificate. To create an SSL certificate, we need to first install Certbort on the server so, let's do it. I recommend selecting the desired version from here, which will give the command to install Certbot.


Install Certbot:
yum -y install yum-utils
     yum-config-manager --enable rhui-REGION-rhel-server-extras rhui-REGION-rhel-server-optional 
     sudo yum install certbot

Create a certificate:

If you have already running service which uses port 80 stop it. To obtain an SSL certificate for your domain using a built-in "standalone" webserver type the following command:
sudo certbot certonly --standalone -d example.com
Here, replace the domain name you want to secure instead of example.com 

which will create the following certificate file to the directory:"/etc/letsencrypt/live/example.com/"
cert.pem, chain.pem, fullchain.pem, privkey.pem.

Now, logged in as root user and go to that directory

sudo -i
cd /etc/letsencrypt/live/example.com/

Next step is to convert those certificate PEM file to password-based PFX format so that we can use in tomcat configuration. We can do this by using the OpenSSL command as below.
openssl pkcs12 -export -out bundle.pfx -inkey privkey.pem -in cert.pem -certfile chain.pem -password pass:password
Replace the password with your desired one. It will create a password-protected file bundle.pfx under the same directory "/etc/letsencrypt/live/example.com/" which we need to use in tomcat configuration.


4. Tomcat configuration for HTTPs:

Go to your tomcat directory, and backup the server.xml file; as we are going to change the file.
cp conf/server.xml conf/server-copy.xml
Edit the server.xml file.
sudo vi conf/server.xml  // no need to type sudo if you are logged in as root user
You can see the following commented XML tag, which we are going to change:

For Tomcat 7:


For tomcat 8:


Add the following changes near to the above XML tag or you can simply change that XML tag as below.


Here, we are changing port 8443 to 443, keystoreType as "PKCS12", keystoreFile as the path of the pfx file created previously and keystorePass as your password that we used while creating PFX file. 

Change the port 8080 to 80:

Under server.xml you can find the following tag.


change the above XML tag as below:


Here, we are changing the port from 8080 to 80 and 8443 to 443. By doing so, if your domain running with port 8080 i.e example.com:8080, now it will open with port 80 i.e example.com. If you type your domain in the browser then you can run it with both HTTP and https i.e http://example.com and https://example.com.

Save the server.xml file by clicking "Esc" key and type ":wq!" and hit Enter.

As we want to always redirect our domain to https. To do so, open the web.xml file under conf/web.xml.

 
sudo vi conf/web.xml
Click "Shift + G" to go the end of the file and add the below code at the end of the file as below.
<security-constraint>
  <web-resource-collection>
  <web-resource-name>Entire Application</web-resource-name>
   <url-pattern>/*</url-pattern>
 </web-resource-collection>
  <!--auth-constraint goes here if you requre authentication-->
 <user-data-constraint>
 <transport-guarantee>CONFIDENTIAL</transport-guarantee>
 </user-data-constraint>
 </security-constraint>


Save the file. This will always redirect to HTTPs.

 
5. Renew certificate:

The certificate is valid for only 90 days so we need to renew before expiry. For this, stop tomcat and type the following command:
sudo certbot renew
sudo -i
cd /etc/letsencrypt/live/example.com/
openssl pkcs12 -export -out bundle.pfx -inkey privkey.pem -in cert.pem -certfile chain.pem -password pass:password
Don't forget to use your existing password. And restart the tomcat server.


Share: