Showing posts with label java. Show all posts

Saturday, January 8, 2022

How to read only specific file from folder and sub folder using Java

In this tutorial, we are going to learn how we can learn only specific files like .png or .jpg or any other file extension which are allocated inside folder and sub-folders.

Here, what we gonna do is to list all the folders and subfolders. After that looping through the folders to filter out and get the specific desired file from those folders.

Create a sample Java class called FolderFileReader.java

Create a method that lists all the subfolders present in the folder.

 public static void listDirSubDir(String directoryName, List<String> directoryList) throws Exception {
        File directory = new File(directoryName);
        File[] fList = directory.listFiles();
        if (fList != null)
            for (File file : fList) {
                if (file.isDirectory()) {
                    String folder = file.getAbsolutePath();
                    directoryList.add(folder);
                    listDirSubDir(folder, directoryList);
                }
            }
    }

We are using recursion in order to list all the subfolders and add the available folders to the List called directoryList

Now, let's create a method that will list all the files present in the particular folder.

public static ArrayList<String> getFolderFiles(String folder) throws Exception {
        ArrayList<String> FileList = new ArrayList<String>();
        FileExtensionFilter filter = new FileExtensionFilter(extension);
        File dir = new File(folder);
        if (!dir.isDirectory()) {
            throw new Exception("Directory does not exists: " + folder);
        }
        String[] list = dir.list(filter);
        assert list != null;
        if (list.length == 0) {
            System.out.println("File not found in this folder : " + dir.getName());
        }
        for (String file : list) {
            String temp = folder + File.separator + file;
            FileList.add(temp);
        }
        return FileList;
    }

The FileExtensionFilter is the filter class used to read specific file like .png or .jpg. 

Let's create the filter class

public static class FileExtensionFilter implements FilenameFilter {

        private String ext;

        public FileExtensionFilter(String ext) {
            this.ext = ext;
        }

        public boolean accept(File dir, String name) {
            return name.endsWith(this.ext);
        }
    }

Now, implement the main method

public static void main(String[] args) {
        String directory = "folder_path";
        ArrayList<String> directoryList = new ArrayList<>();
        try {
            directoryList.add(directory); // adding current directory
            listDirSubDir(directory, directoryList);
            System.out.println("Total directory found: " + directoryList.size());
            int totalFileFound = 0;
            for (String folder : directoryList) {
                ArrayList<String> files = getFolderFiles(folder);
                for (String file : files) {
                    System.out.println(file);
                }
                totalFileFound += files.size();
            }
            System.out.println("Total files found: " + totalFileFound);
        } catch (Exception e) {
            e.printStackTrace();
        }
    }

Here, we are simply getting the list of folders available, looping through it, and getting the files present in each folder.

The overall implementation looks as below:

package io;

import java.io.File;
import java.io.FilenameFilter;
import java.util.ArrayList;
import java.util.List;

public class FolderFileReader {

    private static final String extension = ".dcm";

    public static void main(String[] args) {
        String directory = "folder_path";
        ArrayList<String> directoryList = new ArrayList<>();
        try {
            directoryList.add(directory); // adding current directory
            listDirSubDir(directory, directoryList);
            System.out.println("Total directory found: " + directoryList.size());
            int totalFileFound = 0;
            for (String folder : directoryList) {
                ArrayList<String> files = getFolderFiles(folder);
                for (String file : files) {
                    System.out.println(file);
                }
                totalFileFound += files.size();
            }
            System.out.println("Total files found: " + totalFileFound);
        } catch (Exception e) {
            e.printStackTrace();
        }
    }

    public static void listDirSubDir(String directoryName, List<String> directoryList) throws Exception {
        File directory = new File(directoryName);
        File[] fList = directory.listFiles();
        if (fList != null)
            for (File file : fList) {
                if (file.isDirectory()) {
                    String folder = file.getAbsolutePath();
                    directoryList.add(folder);
                    listDirSubDir(folder, directoryList);
                }
            }
    }

    public static ArrayList<String> getFolderFiles(String folder) throws Exception {
        ArrayList<String> FileList = new ArrayList<String>();
        FileExtensionFilter filter = new FileExtensionFilter(extension);
        File dir = new File(folder);
        if (!dir.isDirectory()) {
            throw new Exception("Directory does not exists: " + folder);
        }
        String[] list = dir.list(filter);
        assert list != null;
        if (list.length == 0) {
            System.out.println("File not found in this folder : " + dir.getName());
        }
        for (String file : list) {
            String temp = folder + File.separator + file;
            FileList.add(temp);
        }
        return FileList;
    }

    public static class FileExtensionFilter implements FilenameFilter {

        private String ext;

        public FileExtensionFilter(String ext) {
            this.ext = ext;
        }

        public boolean accept(File dir, String name) {
            return name.endsWith(this.ext);
        }
    }
}
Share:

How to convert Dicom file into PNG or JPG using Java

In this tutorial, we are going to learn how to convert the Dicom file into Png or Jpg.

If we want to present the Dicom image in the browser or sometimes it might be required to convert it to the desired png or jpg image to manipulate process and analysis.

For this, we can use a very useful library called SimpleItk. Please go over the installation process from this tutorial. If we are dealing with medical images like Dicom, the library is very useful for image processing, manipulation, and analysis. So we suggest using the library.

For reading Dicom metadata please follow this tutorial.

Now, let's begin with the conversion of the Dicom file, for this let's create a sample Java class called DicomConverter.java and create a method for reading the Dicom file

import org.itk.simple.*;
public static ImageFileReader getDcmImageFileReader(String imagePath) {
        ImageFileReader imageFileReader = new ImageFileReader();
        imageFileReader.setImageIO("GDCMImageIO");
        imageFileReader.setFileName(imagePath);
        return imageFileReader;
    }

Now, let's add the method for converting the Dicom

public static void convert(ImageFileReader imageFileReader, String outputPath) {
        Image image = imageFileReader.execute();
        SimpleITK.writeImage(image, outputPath);
    }

Create the main method to run the conversion

 public static void main(String[] args) {
        String inputDicomPath = "inputdicom_path/N2D_0001.dcm";
        String outputPath = "output_path/test.png";
        try {
            ImageFileReader imageFileReader = getDcmImageFileReader(inputDicomPath);
            convert(imageFileReader, outputPath);
        } catch (Exception e) {
            e.printStackTrace();
        }
    }
For Jpg use the .jpg output path.

The overall implementation looks like below:

package dicom;

import org.itk.simple.*;


public class DicomConverter {
    public static void main(String[] args) {
        String inputDicomPath = "/N2D_0001.dcm";
        String outputPath = "/test.png";
        try {
            ImageFileReader imageFileReader = getDcmImageFileReader(inputDicomPath);
            convert(imageFileReader, outputPath);
        } catch (Exception e) {
            e.printStackTrace();
        }
    }

    public static ImageFileReader getDcmImageFileReader(String imagePath) {
        ImageFileReader imageFileReader = new ImageFileReader();
        imageFileReader.setImageIO("GDCMImageIO");
        imageFileReader.setFileName(imagePath);
        return imageFileReader;
    }
    public static void convert(ImageFileReader imageFileReader, String outputPath) {
        Image image = imageFileReader.execute();
        SimpleITK.writeImage(image, outputPath);
    }
}
Share:

Read the Dicom Image metadata using Java

In this tutorial, we are going to learn how we can read Dicom image metadata. 

A Dicom metadata generally contains:

  •  A tag that identifies the attribute, usually in the format (XXXX,XXXX) with hexadecimal numbers.
  • A DICOM Value Representation (VR) that describes the data type and format of the attribute value

We are using SimpleITK library to extract metadata. The library is very handy when used for medical Image analysis. So, please refer SimpleITK library installation from this tutorail.

Once installed and load the library, let's write some Java code that reads metadata. Create a Java file called DicomReader.java

Read the Dicom file using SimpleITK:

import org.itk.simple.ImageFileReader;
public static ImageFileReader getDcmImageFileReader(String imagePath) {
        ImageFileReader imageFileReader = new ImageFileReader();
        imageFileReader.setImageIO("GDCMImageIO");
        imageFileReader.setFileName(imagePath);
        return imageFileReader;
    }
This will read the Dicom file. This example uses the standard SimpleITK native library.

Let's create an actual method that read the metadata from the Dicom Image file

import org.itk.simple.VectorString;
import java.util.LinkedHashMap;
import java.util.Map;
public static Map<String, String> readMetadata(ImageFileReader imageFileReader) {
        Map<String, String> metaData = new LinkedHashMap<>();
        imageFileReader.loadPrivateTagsOn();
        imageFileReader.readImageInformation();
        VectorString metaDataKeys = imageFileReader.getMetaDataKeys(); // get metadata keys
        long metaDataKeySize = metaDataKeys.size();
        System.out.println("Total meta data found: " + metaDataKeySize);
        for (int metaDataKeyIndex = 0; metaDataKeyIndex < metaDataKeySize; metaDataKeyIndex++) {
            String metaDataKey = metaDataKeys.get(metaDataKeyIndex);
            String metaDataValue = imageFileReader.getMetaData(metaDataKey);
            System.out.println("Key: " + metaDataKey + " Value: " + metaDataValue);
            metaData.put(metaDataKey, metaDataValue);
        }
        return metaData;
    }
Here, we are passing the ImageFileReader object, which is obtained from the previous method. And it will extract the metadata and loop through the metadata keys and print key values. pair in the console.

Here is the sample GitHub repo for getting sample test Dicom. Let's add the main method to run the code

 public static void main(String[] args) {
        String imagePath = "path_to_dicom/N2D_0001.dcm";
        try {
            ImageFileReader imageFileReader = getDcmImageFileReader(imagePath);
            Map<String, String> metadata = readMetadata(imageFileReader);
        } catch (Exception e) {
            System.out.println("Error: " + e.getMessage());
        }
    }

The output of the above example will be similar to like this:

Total meta data found: 53
Key: 0008|0008 Value: DERIVED\SECONDARY 
Key: 0008|0016 Value: 1.2.840.10008.5.1.4.1.1.4
Key: 0008|0018 Value: 1.2.826.0.1.3680043.2.1143.1590429688519720198888333603882344634
Key: 0008|0020 Value: 20130717
Key: 0008|0021 Value: 20130717
Key: 0008|0022 Value: 20130717
Key: 0008|0023 Value: 20130717
Key: 0008|0030 Value: 141500
Key: 0008|0031 Value: 142035.93000
Key: 0008|0032 Value: 132518
Key: 0008|0033 Value: 142035.93 
Key: 0008|0050 Value: 
Key: 0008|0060 Value: MR
Key: 0008|0070 Value: BIOLAB
Key: 0008|0080 Value: 
Key: 0008|0090 Value: 
Key: 0008|1030 Value: Hanke_Stadler^0024_transrep 
Key: 0008|103e Value: anat-T1w
Key: 0008|1090 Value: nifti2dicom 
Key: 0010|0010 Value: Jane_Doe
Key: 0010|0020 Value: 02
Key: 0010|0030 Value: 19660101
Key: 0010|0040 Value: F 
Key: 0010|1000 Value: 
Key: 0010|1010 Value: 42
Key: 0010|1030 Value: 75
Key: 0010|21c0 Value: 4
Key: 0018|0050 Value: 0.666666686534882 
Key: 0018|0088 Value: 0.666666686534882 
Key: 0018|1020 Value: 0.4.11
Key: 0018|1030 Value: anat-T1w
Key: 0020|000d Value: 1.2.826.0.1.3680043.2.1143.2592092611698916978113112155415165916
Key: 0020|000e Value: 1.2.826.0.1.3680043.2.1143.515404396022363061013111326823367652
Key: 0020|0010 Value: 433724515 
Key: 0020|0011 Value: 401 
Key: 0020|0012 Value: 1 
Key: 0020|0013 Value: 1 
Key: 0020|0020 Value: L\R 
Key: 0020|0032 Value: -91.4495864331908\-160.06035870244\-142.505487236053
Key: 0020|0037 Value: 0.999032176441525\-0.0217883751691557\0.0382096472372976\0.026519476938784\0.991413870277297\-0.128043957939
Key: 0020|0052 Value: 1.2.826.0.1.3680043.2.1143.6856184167807409206647724161920598374
Key: 0028|0002 Value: 1
Key: 0028|0004 Value: MONOCHROME2 
Key: 0028|0010 Value: 384
Key: 0028|0011 Value: 274
Key: 0028|0030 Value: 0.666666686534882\0.699987828731537 
Key: 0028|0100 Value: 16
Key: 0028|0101 Value: 16
Key: 0028|0102 Value: 15
Key: 0028|0103 Value: 1
Key: 0028|1052 Value: 0 
Key: 0028|1053 Value: 1 
Key: 0028|1054 Value: US

In the above output, the key is the standard metadata key and the corresponding values are the metadata value of Dicom. 

You can find the standard Dicom tags from DICOM Tags. For e.g metadata key 0008|0008 denotes name as Image Type. Please check the link to get all the information on these keys.

The sample Dicom file used here is:


Convert the Dicom into png or jpg using SimpleITK:

Let's write the method which will convert the Dicom to PNG or JPG

 public static void convert(ImageFileReader imageFileReader, String outputImagePath) {
        Image image = imageFileReader.execute();
        SimpleITK.writeImage(image, outputImagePath);
    }
 public static void main(String[] args) {
        String imagePath = "input_path/N2D_0001.dcm";
        String outputImagePath = "output_path/test.png";
        try {
            ImageFileReader imageFileReader = getDcmImageFileReader(imagePath);
            Map<String, String> metadata = readMetadata(imageFileReader);
            convert(imageFileReader, outputImagePath);
        } catch (Exception e) {
            System.out.println("Error: " + e.getMessage());
        }
    }

The overall implementation looks as below:

package simpleitk;

import org.itk.simple.Image;
import org.itk.simple.ImageFileReader;
import org.itk.simple.SimpleITK;
import org.itk.simple.VectorString;

import java.util.LinkedHashMap;
import java.util.Map;

public class DicomReader {
    public static void main(String[] args) {
        String imagePath = "input_path/N2D_0001.dcm";
        String outputImagePath = "output_path/test.png";
        try {
            ImageFileReader imageFileReader = getDcmImageFileReader(imagePath);
            Map<String, String> metadata = readMetadata(imageFileReader);
            convert(imageFileReader, outputImagePath);
        } catch (Exception e) {
            System.out.println("Error: " + e.getMessage());
        }
    }

    public static ImageFileReader getDcmImageFileReader(String imagePath) {
        ImageFileReader imageFileReader = new ImageFileReader();
        imageFileReader.setImageIO("GDCMImageIO");
        imageFileReader.setFileName(imagePath);
        return imageFileReader;
    }

    public static Map<String, String> readMetadata(ImageFileReader imageFileReader) {
        Map<String, String> metaData = new LinkedHashMap<>();
        imageFileReader.loadPrivateTagsOn();
        imageFileReader.readImageInformation();
        VectorString metaDataKeys = imageFileReader.getMetaDataKeys();
        long metaDataKeySize = metaDataKeys.size();
        System.out.println("Total meta data found: " + metaDataKeySize);
        for (int metaDataKeyIndex = 0; metaDataKeyIndex < metaDataKeySize; metaDataKeyIndex++) {
            String metaDataKey = metaDataKeys.get(metaDataKeyIndex);
            String metaDataValue = imageFileReader.getMetaData(metaDataKey);
            System.out.println("Key: " + metaDataKey + " Value: " + metaDataValue);
            metaData.put(metaDataKey, metaDataValue);
        }
        return metaData;
    }

    public static void convert(ImageFileReader imageFileReader, String outputImagePath) {
        Image image = imageFileReader.execute();
        SimpleITK.writeImage(image, outputImagePath);
    }
}

For SimpleITK tutorial, please refer to these docs.

Share:

Tuesday, January 4, 2022

How to resolve the encoding issue while building Java Application

In this tutorial, we are going to understand the different scenarios where we might get encoding issues while building the Java application as a war or jar file and deploy it to the server. 

The main encoding issue here is, for some languages like Hebrew, Chinese, Arabic, etc there might get the chance of appearing as question marks instead of actual specific text. This issue might be due to different cases.

1. Sometimes the serverside rendering language like jsp, gsp pages might cause the issue we can use the following tag in those pages.

<%@ page language="java" contentType="text/html; charset=UTF-8" pageEncoding="UTF-8"%>

2. We might get the issue due to database data where we don't set the configugre the utf-8 encoding. To resolve the issue we can set the jdbc connection url as follows:
jdbc:mysql://hostname/database_naeme?useUnicode=yes&&characterEncoding=UTF-8

3. If our application contains some other language that requires saving operation in the database. Better to create the database using encoding using the following command for the MySQL database.
CREATE DATABASE database_name DEFAULT CHARACTER SET "utf8" COLLATE "utf8_general_ci";
Make sure to change the actual database instead of [database_name].

4. If we are using hibernate then better to configure the settings as
hibernate.connection.charSet=UTF-8
hibernate.connection.characterEncoding=UTF-8
hibbernate.connection.useUnicode=true

5. If we are using build tools like Jenkins for deployment we need to configure the encoding In Jenkins: we can create a global variable and set encoding config as below:


Share:

Wednesday, November 17, 2021

How to Compress(Zip) and Decompress(Unzip) byte array in Java

In this tutorial, we are going to compress and decompress the bytes array. The process may be required when serializing data as a binary file especially when the bytes array has non-unique data.

Let's create the method that compresses the bytes array.


import java.io.ByteArrayOutputStream;
import java.io.IOException;
import java.util.zip.DeflaterOutputStream;
public static byte[] compress(byte[] bytes) throws IOException {
        ByteArrayOutputStream byteArrayOutputStream = new ByteArrayOutputStream();
        DeflaterOutputStream deflaterOutputStream = new DeflaterOutputStream(byteArrayOutputStream);
        deflaterOutputStream.write(bytes);
        deflaterOutputStream.close();
        byte[] compressedBytes = byteArrayOutputStream.toByteArray();
        byteArrayOutputStream.close();
        return compressedBytes;
    }

This method will compress the bytes array. If this results in no reduction in length then the data might be unique or tend to be unique. If the data is truly unique random values then the compression might produce the greater length as well. Compression always has overhead to allow for future decompression.

Now, let's create a method that will decompress or unzip the underlying compressed data. 
import java.util.zip.InflaterInputStream;
import java.io.ByteArrayInputStream;
public static byte[] decompress(byte[] bytes) throws IOException {
        ByteArrayInputStream byteArrayInputStream = new ByteArrayInputStream(bytes);
        InflaterInputStream inflaterInputStream = new InflaterInputStream(byteArrayInputStream);
        ByteArrayOutputStream byteArrayOutputStream = new ByteArrayOutputStream();
        int read;
        while ((read = inflaterInputStream.read()) != -1) {
            byteArrayOutputStream.write(read);
        }
        inflaterInputStream.close();
        byteArrayInputStream.close();
        byteArrayOutputStream.close();
        return byteArrayOutputStream.toByteArray();
    }
Let's create a test example to run these methods.

    public static void main(String[] args) {
        byte[] b = new byte[10000]; // bytes data with 0 values
        System.out.println("Initial Data Size : "+ b.length);
        try {
            byte[] compressedBytes = compress(b);
            System.out.println("Compressed Data Size : "+ compressedBytes.length);
            byte[] decompressedBytes = decompress(compressedBytes);
            System.out.println("Decompressed Data Size: "+ decompressedBytes.length);
        } catch (IOException e) {
            System.out.println("Error while zipping due to : "+e.getMessage());
        }
    }
Output:
Initial Data Size : 10000
Compressed Data Size : 33
Decompressed Data Size: 10000
There is an options to add different algorithm while doing compression using Deflater class as below
import java.util.zip.Deflater;
public static byte[] compress(byte[] bytes) throws IOException {
        Deflater deflater = new Deflater(Deflater.HUFFMAN_ONLY);
        ByteArrayOutputStream byteArrayOutputStream = new ByteArrayOutputStream();
        DeflaterOutputStream deflaterOutputStream = new DeflaterOutputStream(byteArrayOutputStream, deflater);
        deflaterOutputStream.write(bytes);
        deflaterOutputStream.close();
        byte[] compressedBytes = byteArrayOutputStream.toByteArray();
        byteArrayOutputStream.close();
        return compressedBytes;
    }
Here is overall code implementation:

Zip.java

import java.io.ByteArrayOutputStream;
import java.io.IOException;
import java.util.zip.DeflaterOutputStream;
import java.util.zip.InflaterInputStream;
import java.io.ByteArrayInputStream;

public class Zip {

    public static void main(String[] args) {
        byte[] b = new byte[10000]; // bytes data with 0 values
        System.out.println("Initial Data Size : " + b.length);
        try {
            byte[] compressedBytes = compress(b);
            System.out.println("Compressed Data Size : " + compressedBytes.length);
            byte[] decompressedBytes = decompress(compressedBytes);
            System.out.println("Decompressed Data Size: " + decompressedBytes.length);
        } catch (IOException e) {
            System.out.println("Error while zipping due to : " + e.getMessage());
        }
    }

    public static byte[] compress(byte[] bytes) throws IOException {
        ByteArrayOutputStream byteArrayOutputStream = new ByteArrayOutputStream();
        DeflaterOutputStream deflaterOutputStream = new DeflaterOutputStream(byteArrayOutputStream);
        deflaterOutputStream.write(bytes);
        deflaterOutputStream.close();
        byte[] compressedBytes = byteArrayOutputStream.toByteArray();
        byteArrayOutputStream.close();
        return compressedBytes;
    }

    public static byte[] decompress(byte[] bytes) throws IOException {
        ByteArrayInputStream byteArrayInputStream = new ByteArrayInputStream(bytes);
        InflaterInputStream inflaterInputStream = new InflaterInputStream(byteArrayInputStream);
        ByteArrayOutputStream byteArrayOutputStream = new ByteArrayOutputStream();
        int read;
        while ((read = inflaterInputStream.read()) != -1) {
            byteArrayOutputStream.write(read);
        }
        inflaterInputStream.close();
        byteArrayInputStream.close();
        byteArrayOutputStream.close();
        return byteArrayOutputStream.toByteArray();
    }
}
Share:

Tuesday, August 24, 2021

Format Date Time and Set Time Zone in Java

This is a quick tutorial on how to format the java Date in a format like "yyyy-MM-dd HH:mm:ss"  and also set the time zone for the date provided.

I would like to recommend always set the time in UTC while saving it in the database and also for the current date. Latter we can manipulate this UTC time to whatever timezone is required.

Now, let's see how we can format date time and also set the time zone in order to display to the user. Let's look at the example.

import java.text.DateFormat;
import java.text.SimpleDateFormat;
import java.util.Date;
import java.util.TimeZone;

public class DateUtils {
    public static void main(String[] args) {
        String dateFormat = "yyyy-MM-dd HH:mm:ss";
        String timeZone = "Asia/Jerusalem";
        Date date = new Date(); // current server time
        String formattedDate = formatDate(date, dateFormat, timeZone);
        System.out.println(formattedDate);
    }

    public static String formatDate(Date date, String dateFormat, String timeZone) {
        if (date == null) return ""; // or simply throw Exception
        DateFormat simpleDateFormat = new SimpleDateFormat(dateFormat);
         if (timeZone != null)
            simpleDateFormat.setTimeZone(TimeZone.getTimeZone(timeZone));
        return simpleDateFormat.format(date);
    }
}
Here, we have created formatDate method that accepts the parameters date(current date), dateFormat(a format that the date needs to be converted), and timeZone(time zone to convert given date to desired time zone)
DateFormat simpleDateFormat = new SimpleDateFormat(dateFormat);
We are using the java core "SimpleDateFormat" class to convert the date in our desired date format.
simpleDateFormat.setTimeZone(TimeZone.getTimeZone(timeZone));
This will set the given time zone. We are setting the Israel timezone. 

Output:
2021-08-24 12:25:52 
If you need a different format then simply change the dateFormat argument value for e.g
String dateFormat = "yyyy-MM-dd";
Output:
2021-08-24
Get the list of all TimeZones.

If you want to get all the time zones available then simply try using the following method.
import java.time.ZoneId;
import java.util.Set;

public static void visualizeAllTimeZone() {
        Set<String> zoneIds = ZoneId.getAvailableZoneIds();
        for (String id : zoneIds) {
            ZoneId zoneId = ZoneId.of(id);
            System.out.println(zoneId);
        }
    }


Output:

Asia/Aden
America/Cuiaba
Etc/GMT+9
Etc/GMT+8
Africa/Nairobi
America/Marigot
Asia/Aqtau
Pacific/Kwajalein
America/El_Salvador
Asia/Pontianak
Africa/Cairo
Pacific/Pago_Pago
Africa/Mbabane
Asia/Kuching
Pacific/Honolulu
Pacific/Rarotonga
America/Guatemala
Australia/Hobart
Europe/London
America/Belize
America/Panama
Asia/Chungking
America/Managua
America/Indiana/Petersburg
Asia/Yerevan
Europe/Brussels
GMT
Europe/Warsaw
America/Chicago
Asia/Kashgar
Chile/Continental
Pacific/Yap
CET
Etc/GMT-1
Etc/GMT-0
Europe/Jersey
America/Tegucigalpa
Etc/GMT-5
Europe/Istanbul
America/Eirunepe
Etc/GMT-4
America/Miquelon
Etc/GMT-3
Europe/Luxembourg
Etc/GMT-2
Etc/GMT-9
America/Argentina/Catamarca
Etc/GMT-8
Etc/GMT-7
Etc/GMT-6
Europe/Zaporozhye
Canada/Yukon
Canada/Atlantic
Atlantic/St_Helena
Australia/Tasmania
Libya
Europe/Guernsey
America/Grand_Turk
Asia/Samarkand
America/Argentina/Cordoba
Asia/Phnom_Penh
Africa/Kigali
Asia/Almaty
US/Alaska
Asia/Dubai
Europe/Isle_of_Man
America/Araguaina
Cuba
Asia/Novosibirsk
America/Argentina/Salta
Etc/GMT+3
Africa/Tunis
Etc/GMT+2
Etc/GMT+1
Pacific/Fakaofo
Africa/Tripoli
Etc/GMT+0
Israel
Africa/Banjul
Etc/GMT+7
Indian/Comoro
Etc/GMT+6
Etc/GMT+5
Etc/GMT+4
Pacific/Port_Moresby
US/Arizona
Antarctica/Syowa
Indian/Reunion
Pacific/Palau
Europe/Kaliningrad
America/Montevideo
Africa/Windhoek
Asia/Karachi
Africa/Mogadishu
Australia/Perth
Brazil/East
Etc/GMT
Asia/Chita
Pacific/Easter
Antarctica/Davis
Antarctica/McMurdo
Asia/Macao
America/Manaus
Africa/Freetown
Europe/Bucharest
Asia/Tomsk
America/Argentina/Mendoza
Asia/Macau
Europe/Malta
Mexico/BajaSur
Pacific/Tahiti
Africa/Asmera
Europe/Busingen
America/Argentina/Rio_Gallegos
Africa/Malabo
Europe/Skopje
America/Catamarca
America/Godthab
Europe/Sarajevo
Australia/ACT
GB-Eire
Africa/Lagos
America/Cordoba
Europe/Rome
Asia/Dacca
Indian/Mauritius
Pacific/Samoa
America/Regina
America/Fort_Wayne
America/Dawson_Creek
Africa/Algiers
Europe/Mariehamn
America/St_Johns
America/St_Thomas
Europe/Zurich
America/Anguilla
Asia/Dili
America/Denver
Africa/Bamako
Europe/Saratov
GB
Mexico/General
Pacific/Wallis
Europe/Gibraltar
Africa/Conakry
Africa/Lubumbashi
Asia/Istanbul
America/Havana
NZ-CHAT
Asia/Choibalsan
America/Porto_Acre
Asia/Omsk
Europe/Vaduz
US/Michigan
Asia/Dhaka
America/Barbados
Europe/Tiraspol
Atlantic/Cape_Verde
Asia/Yekaterinburg
America/Louisville
Pacific/Johnston
Pacific/Chatham
Europe/Ljubljana
America/Sao_Paulo
Asia/Jayapura
America/Curacao
Asia/Dushanbe
America/Guyana
America/Guayaquil
America/Martinique
Portugal
Europe/Berlin
Europe/Moscow
Europe/Chisinau
America/Puerto_Rico
America/Rankin_Inlet
Pacific/Ponape
Europe/Stockholm
Europe/Budapest
America/Argentina/Jujuy
Australia/Eucla
Asia/Shanghai
Universal
Europe/Zagreb
America/Port_of_Spain
Europe/Helsinki
Asia/Beirut
Asia/Tel_Aviv
Pacific/Bougainville
US/Central
Africa/Sao_Tome
Indian/Chagos
America/Cayenne
Asia/Yakutsk
Pacific/Galapagos
Australia/North
Europe/Paris
Africa/Ndjamena
Pacific/Fiji
America/Rainy_River
Indian/Maldives
Australia/Yancowinna
SystemV/AST4
Asia/Oral
America/Yellowknife
Pacific/Enderbury
America/Juneau
Australia/Victoria
America/Indiana/Vevay
Asia/Tashkent
Asia/Jakarta
Africa/Ceuta
Asia/Barnaul
America/Recife
America/Buenos_Aires
America/Noronha
America/Swift_Current
Australia/Adelaide
America/Metlakatla
Africa/Djibouti
America/Paramaribo
Asia/Qostanay
Europe/Simferopol
Europe/Sofia
Africa/Nouakchott
Europe/Prague
America/Indiana/Vincennes
Antarctica/Mawson
America/Kralendijk
Antarctica/Troll
Europe/Samara
Indian/Christmas
America/Antigua
Pacific/Gambier
America/Indianapolis
America/Inuvik
America/Iqaluit
Pacific/Funafuti
UTC
Antarctica/Macquarie
Canada/Pacific
America/Moncton
Africa/Gaborone
Pacific/Chuuk
Asia/Pyongyang
America/St_Vincent
Asia/Gaza
Etc/Universal
PST8PDT
Atlantic/Faeroe
Asia/Qyzylorda
Canada/Newfoundland
America/Kentucky/Louisville
America/Yakutat
Asia/Ho_Chi_Minh
Antarctica/Casey
Europe/Copenhagen
Africa/Asmara
Atlantic/Azores
Europe/Vienna
ROK
Pacific/Pitcairn
America/Mazatlan
Australia/Queensland
Pacific/Nauru
Europe/Tirane
Asia/Kolkata
SystemV/MST7
Australia/Canberra
MET
Australia/Broken_Hill
Europe/Riga
America/Dominica
Africa/Abidjan
America/Mendoza
America/Santarem
Kwajalein
America/Asuncion
Asia/Ulan_Bator
NZ
America/Boise
Australia/Currie
EST5EDT
Pacific/Guam
Pacific/Wake
Atlantic/Bermuda
America/Costa_Rica
America/Dawson
Asia/Chongqing
Eire
Europe/Amsterdam
America/Indiana/Knox
America/North_Dakota/Beulah
Africa/Accra
Atlantic/Faroe
Mexico/BajaNorte
America/Maceio
Etc/UCT
Pacific/Apia
GMT0
America/Atka
Pacific/Niue
Australia/Lord_Howe
Europe/Dublin
Pacific/Truk
MST7MDT
America/Monterrey
America/Nassau
America/Jamaica
Asia/Bishkek
America/Atikokan
Atlantic/Stanley
Australia/NSW
US/Hawaii
SystemV/CST6
Indian/Mahe
Asia/Aqtobe
America/Sitka
Asia/Vladivostok
Africa/Libreville
Africa/Maputo
Zulu
America/Kentucky/Monticello
Africa/El_Aaiun
Africa/Ouagadougou
America/Coral_Harbour
Pacific/Marquesas
Brazil/West
America/Aruba
America/North_Dakota/Center
America/Cayman
Asia/Ulaanbaatar
Asia/Baghdad
Europe/San_Marino
America/Indiana/Tell_City
America/Tijuana
Pacific/Saipan
SystemV/YST9
Africa/Douala
America/Chihuahua
America/Ojinaga
Asia/Hovd
America/Anchorage
Chile/EasterIsland
America/Halifax
Antarctica/Rothera
America/Indiana/Indianapolis
US/Mountain
Asia/Damascus
America/Argentina/San_Luis
America/Santiago
Asia/Baku
America/Argentina/Ushuaia
Atlantic/Reykjavik
Africa/Brazzaville
Africa/Porto-Novo
America/La_Paz
Antarctica/DumontDUrville
Asia/Taipei
Antarctica/South_Pole
Asia/Manila
Asia/Bangkok
Africa/Dar_es_Salaam
Poland
Atlantic/Madeira
Antarctica/Palmer
America/Thunder_Bay
Africa/Addis_Ababa
Asia/Yangon
Europe/Uzhgorod
Brazil/DeNoronha
Asia/Ashkhabad
Etc/Zulu
America/Indiana/Marengo
America/Creston
America/Punta_Arenas
America/Mexico_City
Antarctica/Vostok
Asia/Jerusalem
Europe/Andorra
US/Samoa
PRC
Asia/Vientiane
Pacific/Kiritimati
America/Matamoros
America/Blanc-Sablon
Asia/Riyadh
Iceland
Pacific/Pohnpei
Asia/Ujung_Pandang
Atlantic/South_Georgia
Europe/Lisbon
Asia/Harbin
Europe/Oslo
Asia/Novokuznetsk
CST6CDT
Atlantic/Canary
America/Knox_IN
Asia/Kuwait
SystemV/HST10
Pacific/Efate
Africa/Lome
America/Bogota
America/Menominee
America/Adak
Pacific/Norfolk
Europe/Kirov
America/Resolute
Pacific/Tarawa
Africa/Kampala
Asia/Krasnoyarsk
Greenwich
SystemV/EST5
America/Edmonton
Europe/Podgorica
Australia/South
Canada/Central
Africa/Bujumbura
America/Santo_Domingo
US/Eastern
Europe/Minsk
Pacific/Auckland
Africa/Casablanca
America/Glace_Bay
Canada/Eastern
Asia/Qatar
Europe/Kiev
Singapore
Asia/Magadan
SystemV/PST8
America/Port-au-Prince
Europe/Belfast
America/St_Barthelemy
Asia/Ashgabat
Africa/Luanda
America/Nipigon
Atlantic/Jan_Mayen
Brazil/Acre
Asia/Muscat
Asia/Bahrain
Europe/Vilnius
America/Fortaleza
Etc/GMT0
US/East-Indiana
America/Hermosillo
America/Cancun
Africa/Maseru
Pacific/Kosrae
Africa/Kinshasa
Asia/Kathmandu
Asia/Seoul
Australia/Sydney
America/Lima
Australia/LHI
America/St_Lucia
Europe/Madrid
America/Bahia_Banderas
America/Montserrat
Asia/Brunei
America/Santa_Isabel
Canada/Mountain
America/Cambridge_Bay
Asia/Colombo
Australia/West
Indian/Antananarivo
Australia/Brisbane
Indian/Mayotte
US/Indiana-Starke
Asia/Urumqi
US/Aleutian
Europe/Volgograd
America/Lower_Princes
America/Vancouver
Africa/Blantyre
America/Rio_Branco
America/Danmarkshavn
America/Detroit
America/Thule
Africa/Lusaka
Asia/Hong_Kong
Iran
America/Argentina/La_Rioja
Africa/Dakar
SystemV/CST6CDT
America/Tortola
America/Porto_Velho
Asia/Sakhalin
Etc/GMT+10
America/Scoresbysund
Asia/Kamchatka
Asia/Thimbu
Africa/Harare
Etc/GMT+12
Etc/GMT+11
Navajo
America/Nome
Europe/Tallinn
Turkey
Africa/Khartoum
Africa/Johannesburg
Africa/Bangui
Europe/Belgrade
Jamaica
Africa/Bissau
Asia/Tehran
WET
Europe/Astrakhan
Africa/Juba
America/Campo_Grande
America/Belem
Etc/Greenwich
Asia/Saigon
America/Ensenada
Pacific/Midway
America/Jujuy
Africa/Timbuktu
America/Bahia
America/Goose_Bay
America/Virgin
America/Pangnirtung
Asia/Katmandu
America/Phoenix
Africa/Niamey
America/Whitehorse
Pacific/Noumea
Asia/Tbilisi
America/Montreal
Asia/Makassar
America/Argentina/San_Juan
Hongkong
UCT
Asia/Nicosia
America/Indiana/Winamac
SystemV/MST7MDT
America/Argentina/ComodRivadavia
America/Boa_Vista
America/Grenada
Asia/Atyrau
Australia/Darwin
Asia/Khandyga
Asia/Kuala_Lumpur
Asia/Famagusta
Asia/Thimphu
Asia/Rangoon
Europe/Bratislava
Asia/Calcutta
America/Argentina/Tucuman
Asia/Kabul
Indian/Cocos
Japan
Pacific/Tongatapu
America/New_York
Etc/GMT-12
Etc/GMT-11
America/Nuuk
Etc/GMT-10
SystemV/YST9YDT
Europe/Ulyanovsk
Etc/GMT-14
Etc/GMT-13
W-SU
America/Merida
EET
America/Rosario
Canada/Saskatchewan
America/St_Kitts
Arctic/Longyearbyen
America/Fort_Nelson
America/Caracas
America/Guadeloupe
Asia/Hebron
Indian/Kerguelen
SystemV/PST8PDT
Africa/Monrovia
Asia/Ust-Nera
Egypt
Asia/Srednekolymsk
America/North_Dakota/New_Salem
Asia/Anadyr
Australia/Melbourne
Asia/Irkutsk
America/Shiprock
America/Winnipeg
Europe/Vatican
Asia/Amman
Etc/UTC
SystemV/AST4ADT
Asia/Tokyo
America/Toronto
Asia/Singapore
Australia/Lindeman
America/Los_Angeles
SystemV/EST5EDT
Pacific/Majuro
America/Argentina/Buenos_Aires
Europe/Nicosia
Pacific/Guadalcanal
Europe/Athens
US/Pacific
Europe/Monaco
You can select whatever time zone you need from the above list. 

In order to get the display name


import java.time.format.TextStyle;
import java.util.Locale;

System.out.println(zoneId.getDisplayName(TextStyle.FULL, Locale.US));
Share:

Tuesday, December 1, 2020

Example to Test Whether String is Null or Empty in Java

This is the short tutorial to test whether the given string is null or empty.

Let's look at the following example:
public class StringUtil {
    public static void main(String[] args) {
        String nonEmptyString = "non empty string";
        String nullString = null;
        String emptyString = "";
        String emptyStringWithWhiteSpace = " ";
        boolean isNonEmpty = isNullOrEmpty(nonEmptyString);
        System.out.println(isNonEmpty); //false
        boolean isNullString = isNullOrEmpty(nullString);
        System.out.println(isNullString); //true
        boolean isEmptyString = isNullOrEmpty(emptyString);
        System.out.println(isEmptyString); //true
        boolean isEmptyStringWithWhiteSpace = isNullOrEmpty(emptyStringWithWhiteSpace);
        System.out.println(isEmptyStringWithWhiteSpace); //true
    }

    private static boolean isNullOrEmpty(String str) {
        if(str == null || str.trim().isEmpty())
            return true;
        return false;
    }

}
  
Here, we are using different types of string value to test whether it is null or empty. In order to test we are simply creating the isNullOrEmpty(String str) method, which will return true if the string is null or empty and false if it is not. If the first condition is satisfied it will not test the second one because we are using OR logic. So, even if the "str" is null it will not throw an error.


The reason behind using trim() is to remove any leading or trailing white space from the given string. So that isEmpty() method will not consider the empty string with white space as a non-empty string.
Basically, isEmpty() will test the length of the string to return the boolean value. So, if the given string contains white space, even if the string is empty it will return false.
Share:

How to Create List of String to Comma Separated String.

This is a short tutorial to show how to convert the list of strings into the comma-separated string.

1. In Java 8 and later:

- Using String.join() method.
import java.util.Arrays;
import java.util.List;

public class JavaStringJoin {
    public static void main(String[] args) {
        List <String> stringList = Arrays.asList("apple","banana","grapes");
        String joinedString = String.join(",", stringList);
        System.out.println(joinedString);
    }
}
Output:
apple,banana,grapes
This will simply join each element of the list with the delimiter provided. Here, we are providing "," as a delimiter. If the element present in the list is null then it will join the "null" to the string. If the delimiter is null then, it will throw Null Pointer Exception.

- Using stream API:
import java.util.Arrays;
import java.util.List;
import java.util.stream.Collectors;

public class JavaStringJoin {
    public static void main(String[] args) {
        List <String> stringList = Arrays.asList("apple","banana","grapes");
        String joinedString = stringList.stream().collect(Collectors.joining(","));
        System.out.println(joinedString);
    }
}
  
- Using StringJoiner:
import java.util.Arrays;
import java.util.List;
import java.util.StringJoiner;

public class JavaStringJoin {
    public static void main(String[] args) {
        List <String> stringList = Arrays.asList("apple","banana","grapes");
        StringJoiner stringJoiner = new StringJoiner(",");
        for (String element : stringList){
            stringJoiner.add(element);
        }
        System.out.println(stringJoiner.toString());
    }
}
  
Actually, String.join() uses this StringJoiner mechanism.

The output will be the same as the previous example.

2. You can use StringBuilder to build the concatenated string:

import java.util.Arrays;
import java.util.List;

public class JavaStringJoin {
    public static void main(String[] args) {
        List <String> stringList = Arrays.asList("apple","banana","grapes");
        StringBuilder stringBuilder = new StringBuilder();
        int size = stringList.size();
        for (int i = 0; i < size; i++) {
            stringBuilder.append(stringList.get(i));
            if (i < size -1){
                stringBuilder.append(",");
            }
        }
        System.out.println(stringBuilder.toString());
    }
}

3. If you are using Apache's commons library, you can use StringUtils.join() method.

String joinedString = StringUtils.join(stringList, ",")
Share:

Saturday, June 13, 2020

How to convert the JSON file to Map and List in Java using Gson.

In this post, we are going to convert the JSON file to Map or List. Here, we are using the Gson library which provides a clean way to do so. You can download the Gson jar file from here.


Now, load the jar file from your IDE.

For IntelliJ Idea:

Go to: File >> Project Structure(Ctr + Alt + Shift + s) >> Libraries and click the + icon on the top left corner and select library file that we downloaded. Apply and save. If you are using in an existing project like Gradle or Maven: 

For Gradle:

Inside build.gradle file under dependencies,
compile 'com.google.code.gson:gson:2.8.6'


For Maven:

Inside pom.xml
<dependency>
  <groupid>com.google.code.gson</groupid>
  <artifactid>gson</artifactid>
  <version>2.8.6</version>
</dependency>

Create a Class that converts a JSON file to Map or List.
package jsonToMap;

import com.google.gson.Gson;
import com.google.gson.stream.JsonReader;

import java.io.FileNotFoundException;
import java.io.FileReader;
import java.util.Map;


public class JsonConverter {

    public static void main(String[] args) {
        String baseDir = System.getProperty("user.dir");
        String jsonPath = baseDir+"/src/jsonToMap/resources/sample.json";
        //convert json map to Map
        Map jsonMap = getMapFromJson(jsonPath);
        System.out.println(jsonMap);
       
    }

    private static Map getMapFromJson(String filePath){
        Gson gson = new Gson();
        JsonReader reader = null;
        try {
            reader = new JsonReader(new FileReader(filePath));
        } catch (FileNotFoundException e) {
            e.printStackTrace();
        }
        return gson.fromJson(reader, Map.class);
    }

}

Also, the sample.json file contains the JSON map under the directory provided.

//sample.json
{
  "text":"first text",
  "digit":1234,
  "boolean":true
}

In the above example, first, it will read the JSON file using JsonReader and we used Gson to convert to Map.

If you want to convert the file which contains the JSON list to List, you can provide the class to convert as below.
//sample.json
[
  {
    "text":"first text",
    "digit":1234,
    "boolean":true
  },
  {
    "text":"second text",
    "digit":1234,
    "boolean":true
  },
  {
    "text":"third text",
    "digit":1234,
    "boolean":true
  }
]


/JsonConverter.java
private static List getListFromJson(String filePath){
        Gson gson = new Gson();
        JsonReader reader = null;
        try {
            reader = new JsonReader(new FileReader(filePath));
        } catch (FileNotFoundException e) {
            e.printStackTrace();
        }
        return gson.fromJson(reader, List.class);
    }
If you want to convert to Custom class, create a class compatible with the fields from the JSON file and provide that class while converting. For e.g:
//sample.json
{
  "text":"first text",
  "digit":1234,
  "aBoolean":true
}


//Sample.java
public class Sample {

    private String text;
    private Double digit;
    private Boolean aBoolean;

    public String getText() {
        return text;
    }

    public void setText(String text) {
        this.text = text;
    }

    public Double getDigit() {
        return digit;
    }

    public void setDigit(Double digit) {
        this.digit = digit;
    }

    public Boolean getaBoolean() {
        return aBoolean;
    }

    public void setaBoolean(Boolean aBoolean) {
        this.aBoolean = aBoolean;
    }
}


//JsonConverter.java
private static Sample getSampleFromJson(String filePath){
        Gson gson = new Gson();
        JsonReader reader = null;
        try {
            reader = new JsonReader(new FileReader(filePath));
        } catch (FileNotFoundException e) {
            e.printStackTrace();
        }
        return gson.fromJson(reader, Sample.class);
    }
Here, we pass the class Sample while converting from the JSON. Make sure your JSON file and class structure match.


Share:

Friday, June 5, 2020

IntelliJ Idea doesn't detect existing Java project.

What to do if your IntelliJ Idea doesn't detect your existing project. Sometimes it may be due to it doesn't find the JDK on you configure path. If you have such a problem reconfigure the JDK.
 
For this, go to: File >> Project Structures(Ctr + Alt + Shift + s) >> Project


Click New >> JDK and provide the path and select JDK. Sometimes it may be due to other versions of JDK setup, in that case, click and select the desired version of java from dropdown menu. Then click apply and ok. That may solve the issue with java not detecting.

Sometimes, although Java is detected we are not able to use the feature of Intellij idea like, run and debug classes, step in step out from class by ctr + click on method or class, find the usage of class and method by click on it. In this case, simply close the project and import it again. For this,

Go to: File >> Close Project >> Import Project


Select your desired project, and select "create from existing source", select the desired library and java version and finish the setup. This will resolve the issues 


Share:

Thursday, June 4, 2020

How to create thumbnail Image using Java.

In this tutorial, I will show you how we can create thumbnail images using Java. Thumbnails are the reduced size of images or videos. Basically, if your website is loading a lot of images with larger pixel values i.e larger size then, the performance of the website will be poor. 

So, while loading web pages with images first showing thumbnails of images and when the user clicks on it then load the original images will increase the user experience and performance of the website.

Here, in order to do so, we are using the library called " thumbnailator" which will help to generate high-quality thumbnails.


Add Dependency:

Download the jar file from here. Load the downloaded jar file on your project.

For IntelliJ Idea:

Go to: File >> Project Structure(Ctr + Alt + Shift + s) >> Libraries  and click the + icon on the top left corner and select library file that we downloaded. Apply and save, now we are ready to write code. If you are using in an existing project like Gradle or Maven:

For Gradle:

Inside build.gradle file under dependencies, 
compile 'net.coobird:thumbnailator:0.4.8'

For Maven:

Inside pom.xml
<dependency>
  <groupid>net.coobird</groupid>
  <artifactid>thumbnailator</artifactid>
  <version>0.4.8</version>
</dependency>

Create thumbnail from image file:

Let's create a class called Thumbnail.java:
import net.coobird.thumbnailator.Thumbnails;
import java.io.File;
import java.io.IOException;

    public class Thumbnail {

    public static void main(String[] args) {
        String inputImagePath = "E:/image.jpg"; //input image path
        File inputFile = new File(inputImagePath);
        String fileName = inputFile.getName();
        String outputPath = "E:" + "/T_"+fileName; //output path to write thumbnail image
        Thumbnail.createFromImageFile(inputFile, outputPath);
    }

    private static void createFromImageFile(File inputFile, String outputPath){
        try {
            Thumbnails.of(inputFile)
                    .size(500, 500)
                    .toFile(outputPath);
        } catch (IOException e) {
            e.printStackTrace();
        }
    }
}

Here, the image is resized to the square of size 500*500 i.e width*height.


Create thumbnail from Buffered image:

private static void createFromBufferedImage(BufferedImage image, String outputPath){
        try {
            Thumbnails.of(image)
                    .size(500, 500)
                    .toFile(outputPath);
        } catch (IOException e) {
            e.printStackTrace();
        }
    }

Create thumbnail Image by scaling:

private static void createByScaling(File inputFile, String outputPath){
        try {
            Thumbnails.of(inputFile)
                    .scale(0.25)
                    .toFile(outputPath);
        } catch (IOException e) {
            e.printStackTrace();
        }
    }
Here, it creates a thumbnail that is 25% of the original image.


Share:

Wednesday, June 3, 2020

Convert Tiff file to JPG/PNG using Java.

How to convert a tiff(tif) file to JPG/PNG using Java.

While dealing with the tiff file, we may have the problem that some browser doesn't support it. Please visit for image format support for different browser here. In this tutorial, we are going to convert the tiff file to a jpg or png file format in an efficient way.


Dependencies required.

In order to convert tiff to other image formats, we are using Jai image i/o  library. Download the jar file from here. As we are using lib version "jai-imageio-core-1.4.0" here, you can find jar file under Assets. Load the jar file in your IDE or if you have existing projects like Maven or Gradle add the dependency as below.

For Gradle:

Add in build.gradle under "dependencies"
compile 'com.github.jai-imageio:jai-imageio-core:1.4.0'

For Maven:

Add in pom.xml
 <dependencies>
    <dependency>
        <groupid>com.github.jai-imageio</groupid>
        <artifactid>jai-imageio-core</artifactid>
        <version>1.4.0</version>
    </dependency>
</dependencies>

Convert Tiff to PNG/JPG

Let's create a class called "TiffConverter.java"

TiffConverter.java:
public static void main(String[] args) {
        File tiffFile = new File("/home/360learntocode/im.tif"); //input path to tif file
        String outputPath = "/home/360learntocode/"; //output path to write file
        String convertFormat = "jpg"; //jpg, png, bmp
        try {
            TiffConverter.convertTiff(tiffFile, outputPath, convertFormat);
        } catch (IOException e) {
            e.printStackTrace();
        }
    }

Provide the appropriate input and output path. You can provide the desired conversion format. As the conversion will reduce the pixel value of the image for jpg, png although BMP conversion doesn't reduce the pixel value.
private static File convertTiff(File tiffFile, String outputPath, String convertFormat) throws IOException {
        String fileName = tiffFile.getName();
        String ext = getFileExtension(fileName);
        fileName = fileName.replace(ext, "."+convertFormat);
        BufferedImage tiff = ImageIO.read(tiffFile);
        File output = new File(outputPath + fileName);
        ImageIO.write(tiff, convertFormat, output);
        return output;
    }


We are using the library to manipulate and convert the tif file. BufferedImage is used to handle and manipulate the image data. For more visit here.

  //get file extension from file name
    private static String getFileExtension(String fileName) {
        int lastIndexOf = fileName.lastIndexOf(".");
        return fileName.substring(lastIndexOf).toLowerCase();
    }
 

Finally, we successfully converted the Tiff/Tif File to the desired format like jpg, png, BMP.

The overall implementation looks like as below:
 import javax.imageio.ImageIO;
import java.awt.image.BufferedImage;
import java.io.File;
import java.io.IOException;


public class TiffConverter {

    public static void main(String[] args) {
        File tiffFile = new File("/home/360learntocode/im.tif"); //input path to tif file
        String outputPath = "/home/360learntocode/"; //output path to write file
        String convertFormat = "jpg"; //jpg, png, bmp
        try {
            TiffConverter.convertTiff(tiffFile, outputPath, convertFormat);
        } catch (IOException e) {
            e.printStackTrace();
        }
    }

    private static File convertTiff(File tiffFile, String outputPath, String convertFormat) throws IOException {
        String fileName = tiffFile.getName();
        String ext = getFileExtension(fileName);
        fileName = fileName.replace(ext, "."+convertFormat);
        BufferedImage tiff = ImageIO.read(tiffFile);
        File output = new File(outputPath + fileName);
        ImageIO.write(tiff, convertFormat, output);
        return output;
    }

    //get file extension from file name
    private static String getFileExtension(String fileName) {
        int lastIndexOf = fileName.lastIndexOf(".");
        return fileName.substring(lastIndexOf).toLowerCase();
    }
}
Share:

Monday, December 24, 2018

Create Simple Secured Restful Web Services Application Using Spring Boot.​

How to create simple restful web services with spring security using Spring Boot.


Prerequisites:

  • Java JDK 1.8
  • IDE 

Introduction:

In this tutorial, we are going to create simple restful web services with spring security included. We are using spring boot scaffolding mechanism, from which we can simply generate the application prototype with its project structure. Simply visit start.spring.io here.

We are using maven project with java and spring boot 2.1.1 with dependencies Web, Security and DevTools.


Generate Project and extract it and open with your favorite Ide. It may take some time to download selected dependencies.

Project Structure:


Here, inside LearntocodeApplication.java there is the main method which will run spring boot application. As we have already added spring boot starter like "Web" inside dependencies section so it has autoconfiguration for tomcat and other feature configuration for running the application.

Make sure required dependencies are in pom.xml file.
  
<dependency>
   <groupid>org.springframework.boot</groupid>
   <artifactid>spring-boot-starter-security</artifactid>
  </dependency>
  <dependency>
   <groupid>org.springframework.boot</groupid>
   <artifactid>spring-boot-starter-web</artifactid>
  </dependency>

  <dependency>
   <groupid>org.springframework.boot</groupid>
   <artifactid>spring-boot-devtools</artifactid>
   <scope>runtime</scope>
  </dependency>
  <dependency>
   <groupid>org.springframework.boot</groupid>
   <artifactid>spring-boot-starter-test</artifactid>
   <scope>test</scope>
  </dependency>
  <dependency>
   <groupid>org.springframework.security</groupid>
   <artifactid>spring-security-test</artifactid>
   <scope>test</scope>
  </dependency>

Run the application:

In order to run your application you can simply run via your editor or via command line. If you are trying to run via command line simply go to project's root directory and type the following command in your terminal.

mvn spring-boot:run
Now you can find spring security generated password in your terminal in order to access the application.
Using generated security password: 0fbaa489-e991-4920-a84d-a9710741c378


Create End Point:

In order to test our application, we need to create some Controller with a specified endpoint.

HelloController.java

package com.example.learntocode.restTest;

import org.springframework.web.bind.annotation.GetMapping;
import org.springframework.web.bind.annotation.RestController;

@RestController
public class HelloController {

    @GetMapping("/")
    public String hello(){
        return "Hello";
    }

}
Here we are creating rest controller HelloController which is wrapped by annotation @RestController and Get mapping to hello action i.e whenever "${baseUrl}/" endpoint request it will hit this "hello" action.

Test:

I am using postman for a testing endpoint. If we hit endpoint "http://localhost:8080" with Get request we will get Unauthorized message as follows.


Now lets test with the credential provided by spring security as discussed above with generated password.

Note: The default username is "user" and password is generated one. It will generate a new password for each time when we run our application.


Here we have successfully secured our application.

In order to customize the username and password go to "application.properties" and configure as follows.

spring.security.user.name=yourUserName
spring.security.user.password=yourPassword

Share:

Wednesday, September 19, 2018

Issue With Tomcat Catalina Permission Denied.

For Tomcat situated on root directory in Linux O.S, tomcat Catalina needs to have permission, and for the user who has run the tomcat may face the issue who does not have required permission to do so. So while running tomcat we may face the similar issues as below:

Using CATALINA_BASE:   /opt/tomcat
Using CATALINA_HOME:   /opt/tomcat
Using CATALINA_TMPDIR: /opt/tomcat/temp
Using JRE_HOME:        /home/kchapagain/spark/jdk1.8.0_101
Using CLASSPATH:       /opt/tomcat/bin/bootstrap.jar:/opt/tomcat/bin/tomcat-juli.jar
touch: cannot touch '/opt/tomcat/logs/catalina.out': Permission denied
tomcat/bin/catalina.sh: 415: tomcat/bin/catalina.sh: cannot create /opt/tomcat/logs/catalina.out: Permission denied
In order to resolve this issues one's need to give the permission for that user as:
sudo chown -R kchapagain:kchapagain /opt/tomcat/
Where "kchapagain" is my os user. And my apache-tomcat location is under /opt and apache-tomcat name is "tomcat".


Now start tomcat:
sudo kill -9 `pgrep java || echo 1` //run if java is already in used for specific port to avoid address already bind issue.
sh /opt/tomcat/bin/startup.sh
The output will be similar as:
Using CATALINA_BASE:   /opt/tomcat
Using CATALINA_HOME:   /opt/tomcat
Using CATALINA_TMPDIR: /opt/tomcat/temp
Using JRE_HOME:        /home/kchapagain/spark/jdk1.8.0_101
Using CLASSPATH:       /opt/tomcat/bin/bootstrap.jar:/opt/tomcat/bin/tomcat-juli.jar
Tomcat started.
Share:

Sunday, March 19, 2017

How to create facebook messenger bot part 2

Setup Welcome Screen For Greeting Text and Get Started Button 

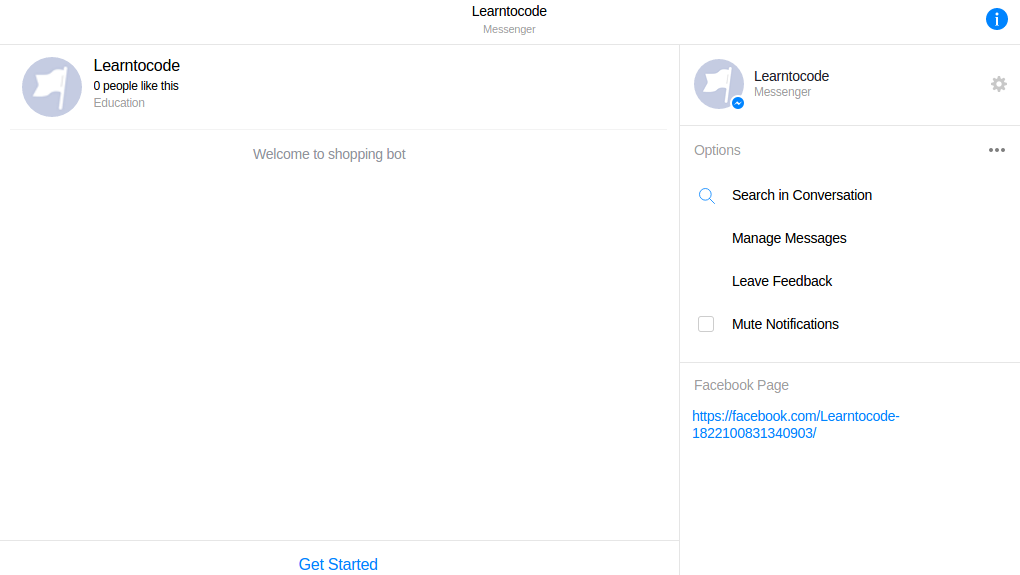
This will be the welcome screen for the new conversation. It will appear only for the first time. This will be similar like this.


For this, we have to make the post request. I am using postman for the post request, you can simply add postman extension in your chrome.

Example
curl -X POST -H "Content-Type: application/json" -d '{
  "setting_type":"greeting",
  "greeting":{
    "text":"Welcome to shopping bot" //you can text whatever you want
  }
}' "https://graph.facebook.com/v2.6/me/thread_settings?access_token=PAGE_ACCESS_TOKEN"   // PAGE_ACCESS_TOKEN = previously generated page access token
  1. Select Post option from drop down of a postman. Enter request url = https://graph.facebook.com/v2.6/me/thread_settings?access_token=PAGE_ACCESS_TOKEN
  2. In headers tab set key=Content-Type and value=application/json
  3. In body tab select raw radio button and enter 
{
  "setting_type":"greeting",
  "greeting":{
    "text":"Welcome to shopping bot" 
  }
}
After sending you can see output as
{
  "result": "Successfully updated greeting"
}
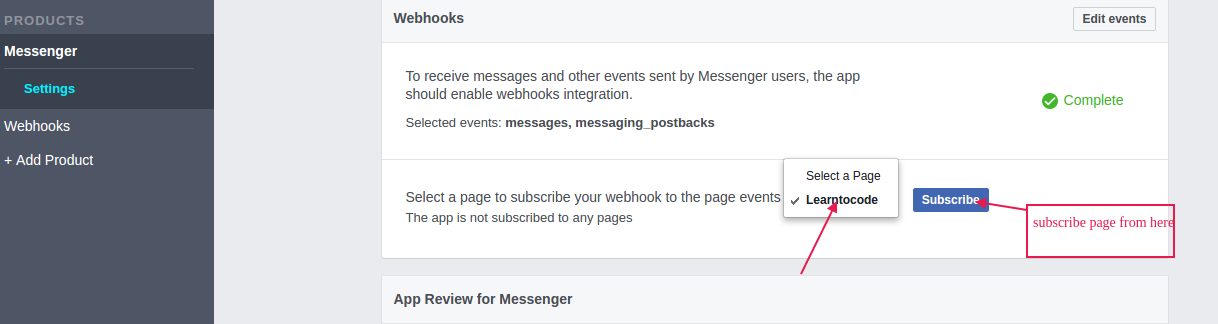
Similarly, you can set for get started button.

Example


curl -X POST -H "Content-Type: application/json" -d '{
  "setting_type":"call_to_actions",
  "thread_state":"new_thread",
  "call_to_actions":[
    {
      "payload":"InitialPayload"
    }
  ]
}' "https://graph.facebook.com/v2.6/me/thread_settings?access_token=PAGE_ACCESS_TOKEN"      
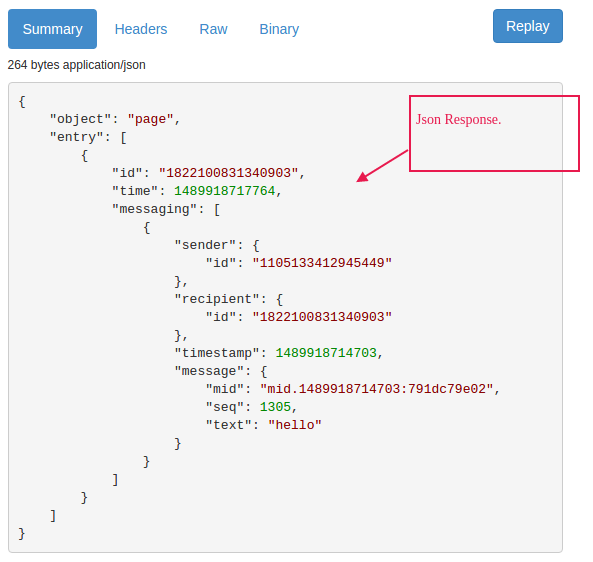
After setting you can see like

After click Get Started button you can see JSON format where we check for "IntialPayload" in order
"postback": {
                        "payload": "InitialPayload"
                    }
to replay some message for that user.

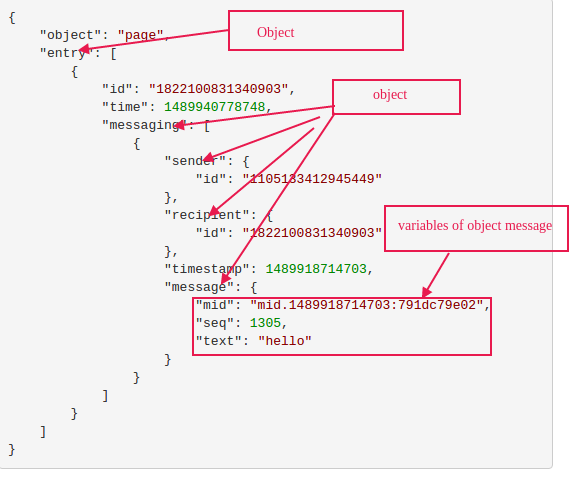
Now it's time to handle JSON format.
Here we are going to create Class for each object.


MessageRequest.java


public class MessageRequest {
    String object;
    List<entry> entry = new ArrayList<entry>();

    public String getObject() {
        return object;
    }

    public void setObject(String object) {
        this.object = object;
    }

    public List<entry> getEntry() {
        return entry;
    }

    public void setEntry(List<entry> entry) {
        this.entry = entry;
    }
}

Entry.java
public class Entry {
    String id;
    String time;
    List<messaging> messaging = new ArrayList<messaging>();

    public String getId() {
        return id;
    }

    public void setId(String id) {
        this.id = id;
    }

    public String getTime() {
        return time;
    }

    public void setTime(String time) {
        this.time = time;
    }

    public List<messaging> getMessaging() {
        return messaging;
    }

    public void setMessaging(List<messaging> messaging) {
        this.messaging = messaging;
    }
}


Sender.java
public class Sender {
    String id;

    public String getId() {
        return id;
    }

    public void setId(String id) {
        this.id = id;
    }
}
Recipient.java
public class Recipient {
    String id;

    public String getId() {
        return id;
    }

    public void setId(String id) {
        this.id = id;
    }
}
Message.java
public class Message {
    String mid;
    String seq;
    String text;
    Long stickerId;
    List<attachment> attachments;
    Attachment attachment;
    QuickReplies quick_reply;
    List<quickreplies> quick_replies;
    public String getMid() {
        return mid;
    }

    public void setMid(String mid) {
        this.mid = mid;
    }

    public String getSeq() {
        return seq;
    }

    public void setSeq(String seq) {
        this.seq = seq;
    }

    public String getText() {
        return text;
    }

    public void setText(String text) {
        this.text = text;
    }

    public Long getStickerId() {
        return stickerId;
    }

    public void setStickerId(Long stickerId) {
        this.stickerId = stickerId;
    }

    public List<attachment> getAttachments() {
        return attachments;
    }

    public void setAttachments(List<attachment> attachments) {
        this.attachments = attachments;
    }

    public Attachment getAttachment() {
        return attachment;
    }

    public void setAttachment(Attachment attachment) {
        this.attachment = attachment;
    }

    public QuickReplies getQuick_reply() {
        return quick_reply;
    }

    public void setQuick_reply(QuickReplies quick_reply) {
        this.quick_reply = quick_reply;
    }

    public List<quickreplies> getQuick_replies() {
        return quick_replies;
    }

    public void setQuick_replies(List<quickreplies> quick_replies) {
        this.quick_replies = quick_replies;
    }

    
}

Postback.java
public class Postback {
    String payload;
    Referral referral;
    public String getPayload() {
        return payload;
    }

    public void setPayload(String payload) {
        this.payload = payload;
    }

    public Referral getReferral() {
        return referral;
    }

    public void setReferral(Referral referral) {
        this.referral = referral;
    }

}

Referral.java
public class Referral {
    String ref;
    String source;
    String type;

    public String getRef() {
        return ref;
    }

    public void setRef(String ref) {
        this.ref = ref;
    }

    public String getSource() {
        return source;
    }

    public void setSource(String source) {
        this.source = source;
    }

    public String getType() {
        return type;
    }

    public void setType(String type) {
        this.type = type;
    }
}


Attachment.java
public class Attachment {
    String type;
    Payload payload;

    public String getType() {
        return type;
    }

    public void setType(String type) {
        this.type = type;
    }

    public Payload getPayload() {
        return payload;
    }

    public void setPayload(Payload payload) {
        this.payload = payload;
    }
}
QuickReplies.java
public class QuickReplies {
    String content_type;
    String title;
    String payload;

    public String getContent_type() {
        return content_type;
    }

    public void setContent_type(String content_type) {
        this.content_type = content_type;
    }

    public String getTitle() {
        return title;
    }

    public void setTitle(String title) {
        this.title = title;
    }

    public String getPayload() {
        return payload;
    }

    public void setPayload(String payload) {
        this.payload = payload;
    }
}
Messaging.java
public class Messaging {
    Sender sender;
    Recipient recipient;
    String timestamp;
    Message message;
    Postback postback;
    Referral referral;

    public Sender getSender() {
        return sender;
    }

    public void setSender(Sender sender) {
        this.sender = sender;
    }

    public Recipient getRecipient() {
        return recipient;
    }

    public void setRecipient(Recipient recipient) {
        this.recipient = recipient;
    }

    public String getTimestamp() {
        return timestamp;
    }

    public void setTimestamp(String timestamp) {
        this.timestamp = timestamp;
    }

    public Message getMessage() {
        return message;
    }

    public void setMessage(Message message) {
        this.message = message;
    }

    public Postback getPostback() {
        return postback;
    }

    public void setPostback(Postback postback) {
        this.postback = postback;
    }

    public Referral getReferral() {
        return referral;
    }

    public void setReferral(Referral referral) {
        this.referral = referral;
    }
}

Element.java

public class Element {
    String title;
    String subtitle;
    String image_url;
    List<Button> buttons;

    public String getTitle() {
        return title;
    }

    public void setTitle(String title) {
        this.title = title;
    }

    public String getSubtitle() {
        return subtitle;
    }

    public void setSubtitle(String subtitle) {
        this.subtitle = subtitle;
    }

    public String getImage_url() {
        return image_url;
    }

    public void setImage_url(String image_url) {
        this.image_url = image_url;
    }

    public List<Button> getButtons() {
        return buttons;
    }

    public void setButtons(List<Button> buttons) {
        this.buttons = buttons;
    }
}
Button.java
public class Button {
    String type;
    String title;
    String payload;
    String url;

    public String getType() {
        return type;
    }

    public void setType(String type) {
        this.type = type;
    }

    public String getTitle() {
        return title;
    }

    public void setTitle(String title) {
        this.title = title;
    }

    public String getPayload() {
        return payload;
    }

    public void setPayload(String payload) {
        this.payload = payload;
    }

    public String getUrl() {
        return url;
    }

    public void setUrl(String url) {
        this.url = url;
    }
}

Payload.java

public class Payload {
        String template_type;
        String text;
        List<element> elements;
    List<button> buttons;
    
    public String getTemplate_type() {
    return template_type;
    }
    
    public void setTemplate_type(String template_type) {
    this.template_type = template_type;
    }
    
    public String getText() {
    return text;
    }
    
    public void setText(String text) {
    this.text = text;
    }
    
    public List<element> getElements() {
    return elements;
    }
    
    public void setElements(List<element> elements) {
    this.elements = elements;
    }
    
    public List<button> getButtons() {
    return buttons;
    }
    
    public void setButtons(List<button> buttons) {
    this.buttons = buttons;
    }
    }

Now its time to reply some text when user click Get Started button. All the callback messages should be listen in POST request. Lets make one helper class for making format of message to send. Here I am going to make FacebookHelper.java.
def private processMessages(){
        //make post request as readable
        String payload = FacebookHelper.readRequest(request);
        //convert json format to java readable format
        MessageRequest messageRequest = new Gson().fromJson(payload,MessageRequest.class)
        List<messaging> messagings = messageRequest.entry.get(0).messaging;
        for (Messaging event:messagings){
            try {
                if (event.postback != null){
                    sendPostbackMessge(event);
                }
            }catch (Exception e){
                e.printStackTrace();
                response.status = 200;
                render(true);
                return ;
            }

        }
        response.status = 200;
        render(true);
    }


Here line 3 will convert the JSON post request format to readable form which we will create in FacebookHelper.java.
public class FacebookHelper {

public static String readRequest(HttpServletRequest request){
        String line = null;
        StringBuffer stringBuffer = new StringBuffer();
        try {
            BufferedReader bufferedReader = request.getReader();
            while ((line = bufferedReader.readLine())!=null){
                stringBuffer.append(line);
            }
        }catch (Exception e){
            e.printStackTrace();
        }
        return stringBuffer.toString();
    }
}
Line 9 check wheather the callback message is postback or not. If it is postback message then it will call sendPostbackMessge() method for checking and reply message.


private static sendPostbackMessge(Messaging event){
        List<string> postbackReplies =  testAndGetPostBackReplies(event)
        if (postbackReplies.size()>0){
            for (String postrep:postbackReplies){
                FacebookHelper.sendPostRequest(postrep);
            }
        }
    }

private static testAndGetPostBackReplies(Messaging event){
        List<string> postback = new ArrayList();
        String payload = event.postback.payload
        switch (payload){
            case "InitialPayload":
               postback = FacebookHelper.getInitialPostbackTemplate(event)
                break;
        }
        return postback
    }


public class FacebookHelper {
public static List<string> getInitialPostbackTemplate(Messaging event){
        List<string> replies = new ArrayList<string>();
        Message message = getMessage("Hello how can i help you?");
        String jsonReply = getJsonReply(event.getSender().getId(),message);
        replies.add(jsonReply);
        return replies;
    }
}


private static Message getMessage(String messg){
        Message message = new Message();
        message.setText(messg);
        return message;
    }


private static String getJsonReply(String senderId, Message message){
        Recipient recipient = new Recipient();
        recipient.setId(senderId);
        Messaging reply = new Messaging();
        reply.setRecipient(recipient);
        reply.setMessage(message);
        String replyJson = new Gson().toJson(reply);
        System.out.println("reply json------------------"+replyJson);
        return replyJson;
    }


getJsonReply method simply convert reply message in Json Format to post to client. In order to send message you have to call sendPostRequest() method.

public static String sendPostRequest(String payload){
        StringBuffer jsonString;
        try {
            URL url = new URL("https://graph.facebook.com/v2.6/me/messages?access_token=YOUR-PAGE-ACCESS-TOKEN");
            HttpURLConnection connection = (HttpURLConnection) url.openConnection();

            connection.setDoInput(true);
            connection.setDoOutput(true);
            connection.setRequestMethod("POST");
            connection.setRequestProperty("Accept", "application/json");
            connection.setRequestProperty("Content-Type", "application/json; charset=UTF-8");
            OutputStreamWriter writer = new OutputStreamWriter(connection.getOutputStream(), "UTF-8");
            writer.write(payload);
            writer.close();
            BufferedReader br = new BufferedReader(new InputStreamReader(connection.getInputStream()));
            jsonString = new StringBuffer();
            String line;
            while ((line = br.readLine()) != null) {
                jsonString.append(line);
            }
            br.close();
            connection.disconnect();
        } catch (Exception e) {
            throw new RuntimeException(e.getMessage());
        }
        return jsonString.toString();

    }


Now you can see the output when Get Started button is clicked for the first time.


In the next tutorial we will create a final shopping bot, which have image attachment, buttons, quick replies button, option menu and payment system.

Share:

Monday, March 6, 2017

How to create facebook messenger bot part 1

Facebook gives the large platform for the messenger. In this tutorial series, we are going to create our own facebook messenger bot.  Please refer facebook developer messenger platform here for the documentation. We are going to create simple messenger bot for shopping.


Step 1: The first thing is to create a facebook app and page if you don't have. so let's create facebook app and page.


Click to create the app and fill the pop up modal and create app id. This will create the page with app id number. Here click +add product to add messenger.


Now create facebook page of your own which is the identity of your bot so, include the appropriate name and image for the page. 

Step 2: Setup Webhook

In order to get the update or handle and process the messages of conversation between bot and the client, we required to setup callback Url to process messages. With the live server its fine but we have to develop on the local server, as our local server is not a live one so we have to tunnel our local server to live one. For this, we are using ngrok. Please refer my youtube video to set up ngrok.


Create bot application in your editor, run the application and tunnel it using ngrok. The tunneled url will be similar like this http://849ac456.ngrok.io/. 


1.Generate a page access token: Use the page created to generate page access token.


2.Setup Webhook(Callback URL):


Here callback ULR is where we process post and get request. we need to verify this token later. Subscription field messages is subscribed to get the update when the message has been sent to your page and messaging_postback is for postback replies. In order to verify we need to write verify code in the get request of callback URL.

class MessengerController {

   def verifyAndProcess(){
        if (request.getMethod() == 'GET'){
            if (request.getParameter('hub.mode') == 'subscribe' &&
                    request.getParameter('hub.verify_token') == "bot") {
                log.info("Validating webhook");
                response.setStatus(200)
                 render(request.getParameter('hub.challenge'))
            } else {
                log.error("Failed validation. Make sure the validation tokens match.")
                response.setStatus(403)
                render(false)
            }
        }else {
            processMessages() //for processing messages
        }

    }
}
Finally, click verify and save. Here I am using grails application if you are using servlet then you have to verify it in doGet method and process post request message in doPost method.

Now you have to subscribe your page.


Step 3: Create link to messenger
In order to chat with a bot, we have to simply provide the link to the messenger for this use following view.
<div class="jumbotron">
<div class="container">
<div class="page-header">
<h1>
Messenger Chat bot</h1>
</div>
<div class="fb-messengermessageus" color="blue" messenger_app_id="your app-id" page_id="your PAGE_ID" size="standard">
</div>
</div>
</div>
<script>

    window.fbAsyncInit = function() {
        FB.init({
            appId: "1201209609977381", //your app-id
            xfbml: true,
            version: "v2.6"
        });

    };

    (function(d, s, id){
        var js, fjs = d.getElementsByTagName(s)[0];
        if (d.getElementById(id)) { return; }
        js = d.createElement(s); js.id = id;
        js.src = "//connect.facebook.net/en_US/sdk.js";
        fjs.parentNode.insertBefore(js, fjs);
    }(document, 'script', 'facebook-jssdk'));

</script>


If you type some text in messenger after clicking message us button you  can see post response in ngrok history console as bellow.


In the next tutorial, we are going to learn how to handle this JSON format and make a bot to reply.


Share: